ASP.NET Web Forms vs. Blazor: Reasons to Migrate and Short Transition Guide
2/1/2024
By: Devessence Inc
Since its debut in 2002, ASP.NET Web Forms has been a popular technology for web development on the Microsoft platform. However, despite its robust feature set and maturity, the need for a technology transition has become increasingly more critical for organizations due to a variety of business factors. Many web applications still rely on this aging technology, but establishing an upgrade strategy is becoming critical for cost savings, increased flexibility, improved performance, and enhanced security.
Migrating an application from ASP.NET Web Forms to Blazor is one possible option which organizations can explore. In our article, we'll explore the compelling reasons for this transition, look at the benefits it brings, and provide a clear roadmap for a safe and seamless migration. Join us as we navigate the evolution of web development and unlock the potential of Blazor for your applications.
Why Should You Migrate from ASP.NET Web Forms?
ASP.NET Web Forms was a cornerstone of .NET web development for almost two decades. It simplified web app development by incorporating desktop development patterns and enabled rapid web page creation with reusable UI controls and seamless event handling. The framework boasted a rich ecosystem of Web Forms UI controls for dynamic data visualizations.
Despite all of this, ASP.NET Web Forms faces some severe challenges in adapting to very important trends:
The shift to .NET Core.
Microsoft introduced .NET Core in 2014 and declared that ASP.NET Web Forms would not be migrated to the new development platform due to significant changes and practical constraints. This means that Web Forms applications cannot take advantage of the improvements made in .NET Core and later versions of .NET.
Additionally, even for a company as large as Microsoft, there is a limit to the number of web frameworks it can support simultaneously. As a result, all new development on the .NET Framework ceased in 2019, as Microsoft decided to focus all of their future efforts on .NET Core. The source code for ASP.NET Web Forms is publicly available in reference form, but it remains Windows-only and without an open-source contribution model.
The shift of app logic to the client.
Traditionally, all .NET-based web frameworks, including ASP.NET Web Forms, followed a server-rendered model, where the server processes requests and sends responses to the browser. However, the evolving capabilities of browsers, coupled with the rise of client-side frameworks such as Angular and React, led to a shift in application architectures, requiring developers to leverage the client for enhanced user interactions.
While this approach brings many advantages, bridging the .NET and JavaScript ecosystems introduced complexities, requiring expertise in two parallel worlds and posing challenges of code duplication and evolving front-end technologies.
Blazor: Full-Stack Web Development With .NET
Blazor is a web UI framework tat allows developers to write client-side logic and UI components using C#, compiling them into standard .NET assemblies. These assemblies can run directly in the browser, thanks to WebAssembly, eliminating the need for browser plugins. Alternatively, Blazor offers server-side execution as well, managing UI interactions in real-time over a real-time connection with the browser. With tooling support in Visual Studio and Visual Studio Code, Blazor offers:
- a full UI component model;
- forms and validation;
- layouts;
- dependency injection;
- client-side routing;
- in-browser debugging;
- JavaScript interop.
Although sharing some concepts, ASP.NET Web Forms and Blazor differ significantly in their architectural foundations. Let's take a closer look at this distinction.
ASP.NET Web Forms vs. Blazor: Architecture
Conceptually, Blazor has a lot in common with ASP.NET Web Forms. Both frameworks offer component-based, event-driven, stateful UI programming models. So, if you're coming from an ASP.NET Web Forms background, a lot in Blazor will feel familiar. However, there are some distinct feature differences that shape their development paradigms.
ASP.NET Web Forms architecture
ASP.NET Web Forms adheres to a server-based page-centric architecture. Each HTTP request for a specific location in the app corresponds to a discrete page, generating a response from ASP.NET.
The contents of the browser are fully refreshed based on the response from the server. Web Forms pages encompass HTML markup as well as C# or Visual Basic code, often located in a separate code-behind class housing logic and event-handling capabilities, and controls.
Controls, reusable units of web UI, can be programmatically placed and interacted with on a page. Intriguingly, the web server interprets the contents of the .aspx files and recompiles them upon any changes, even during production execution (sometimes referred to as hot reloading).
The event lifecycle of pages is extensive, raising events for initialization, load, prerender, and unload, occurring as the ASP.NET runtime executes the page's code for each request. Controls on a page typically post back to the presenting page, carrying a payload in a hidden ViewState field and containing information about the controls' state at the time of rendering.
Blazor architecture
Blazor, as a client-side web UI framework, differs substantially in its architectural approach from Web Forms. It manages user interactions and UI updates without adhering to a request-response model. Instead, user interactions are treated as events outside the context of a specific HTTP request.
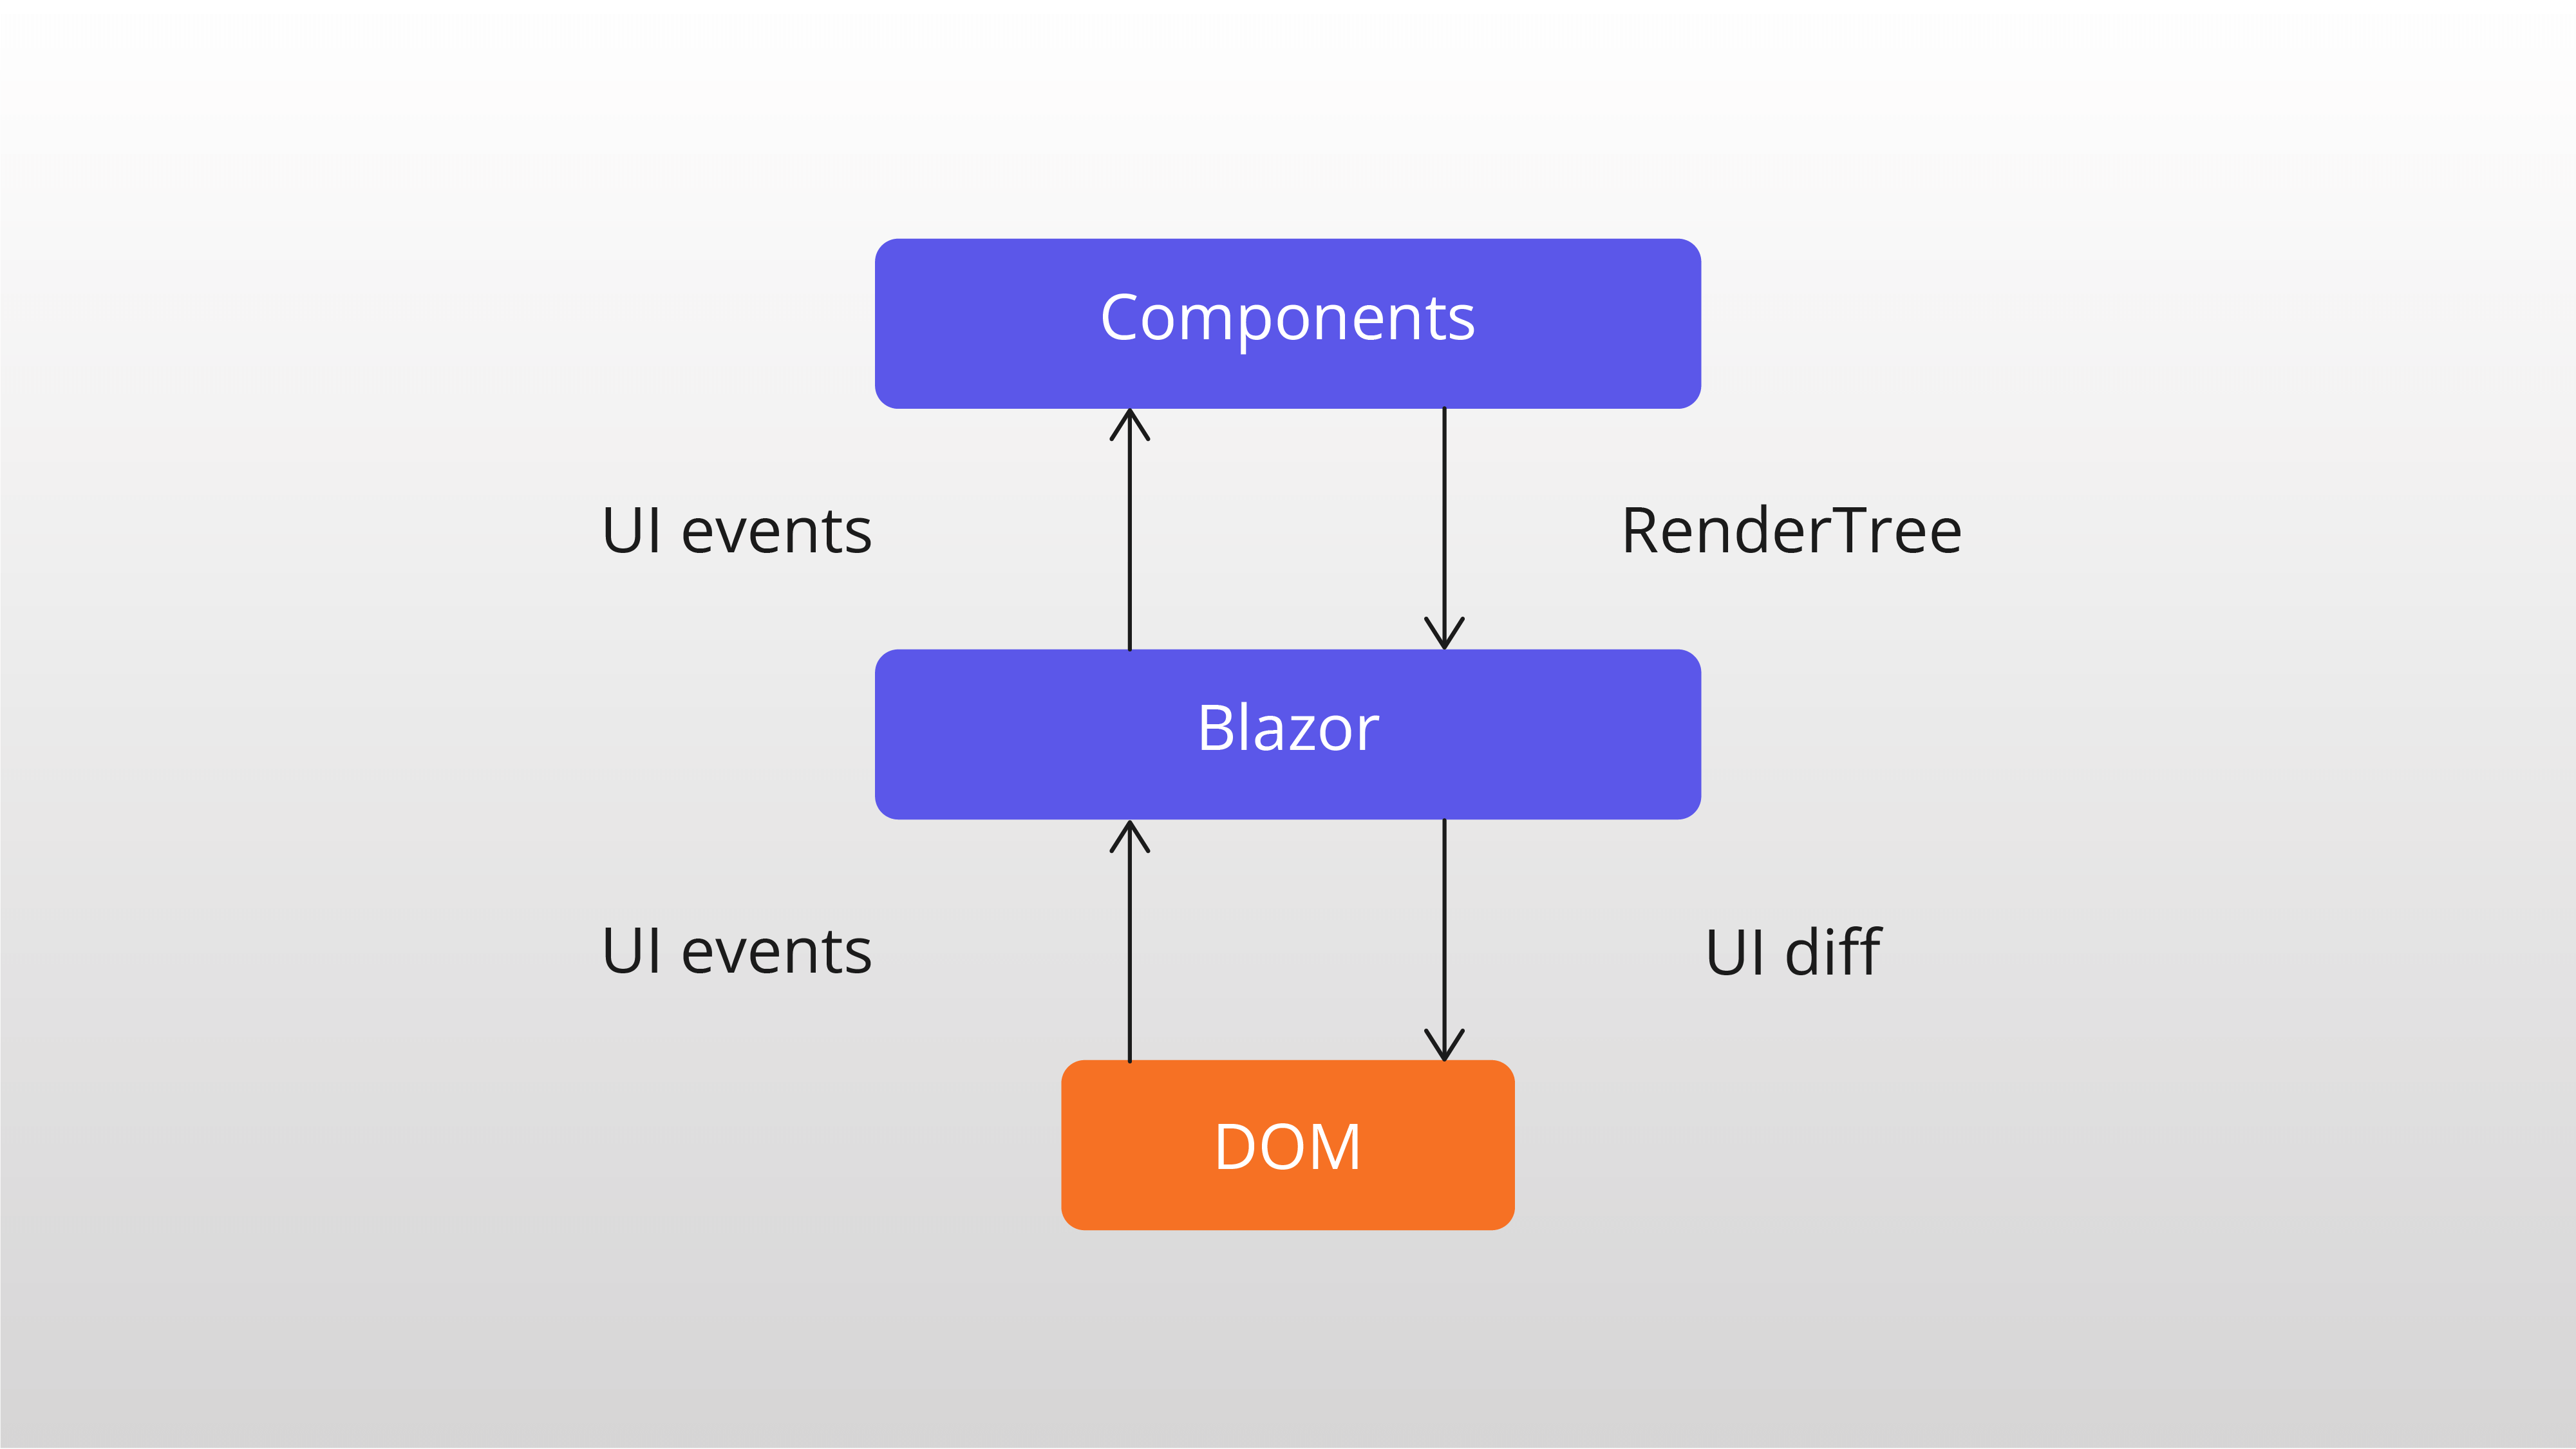
Blazor apps consist of root components rendered on an HTML page. The hosting model determines the specifics of component rendering. Blazor components represent reusable UI segments. Each component manages its state and dictates rendering logic, including rendering other components. Event handlers for specific user interactions are specified within components to update their state.
Blazor's rendering process involves rendering components to an in-memory representation of the DOM (ie. a shadow DOM) called a RenderTree, allowing efficient tracking of changes. Components don't directly render to the DOM, and Blazor calculates a UI diff between newly rendered and previous outputs, applying changes judiciously to the DOM.
Manual rendering events can be provided when a component's state changes outside a standard UI event.
In other words, while ASP.NET Web Forms follows a page-centric approach, Blazor adopts a more event-driven, component-based structure, embracing modern client-side development paradigms.
Blazor App Hosting Models
Traditionally, there were three primary Blazor hosting models. Let’s take a closer look at them.
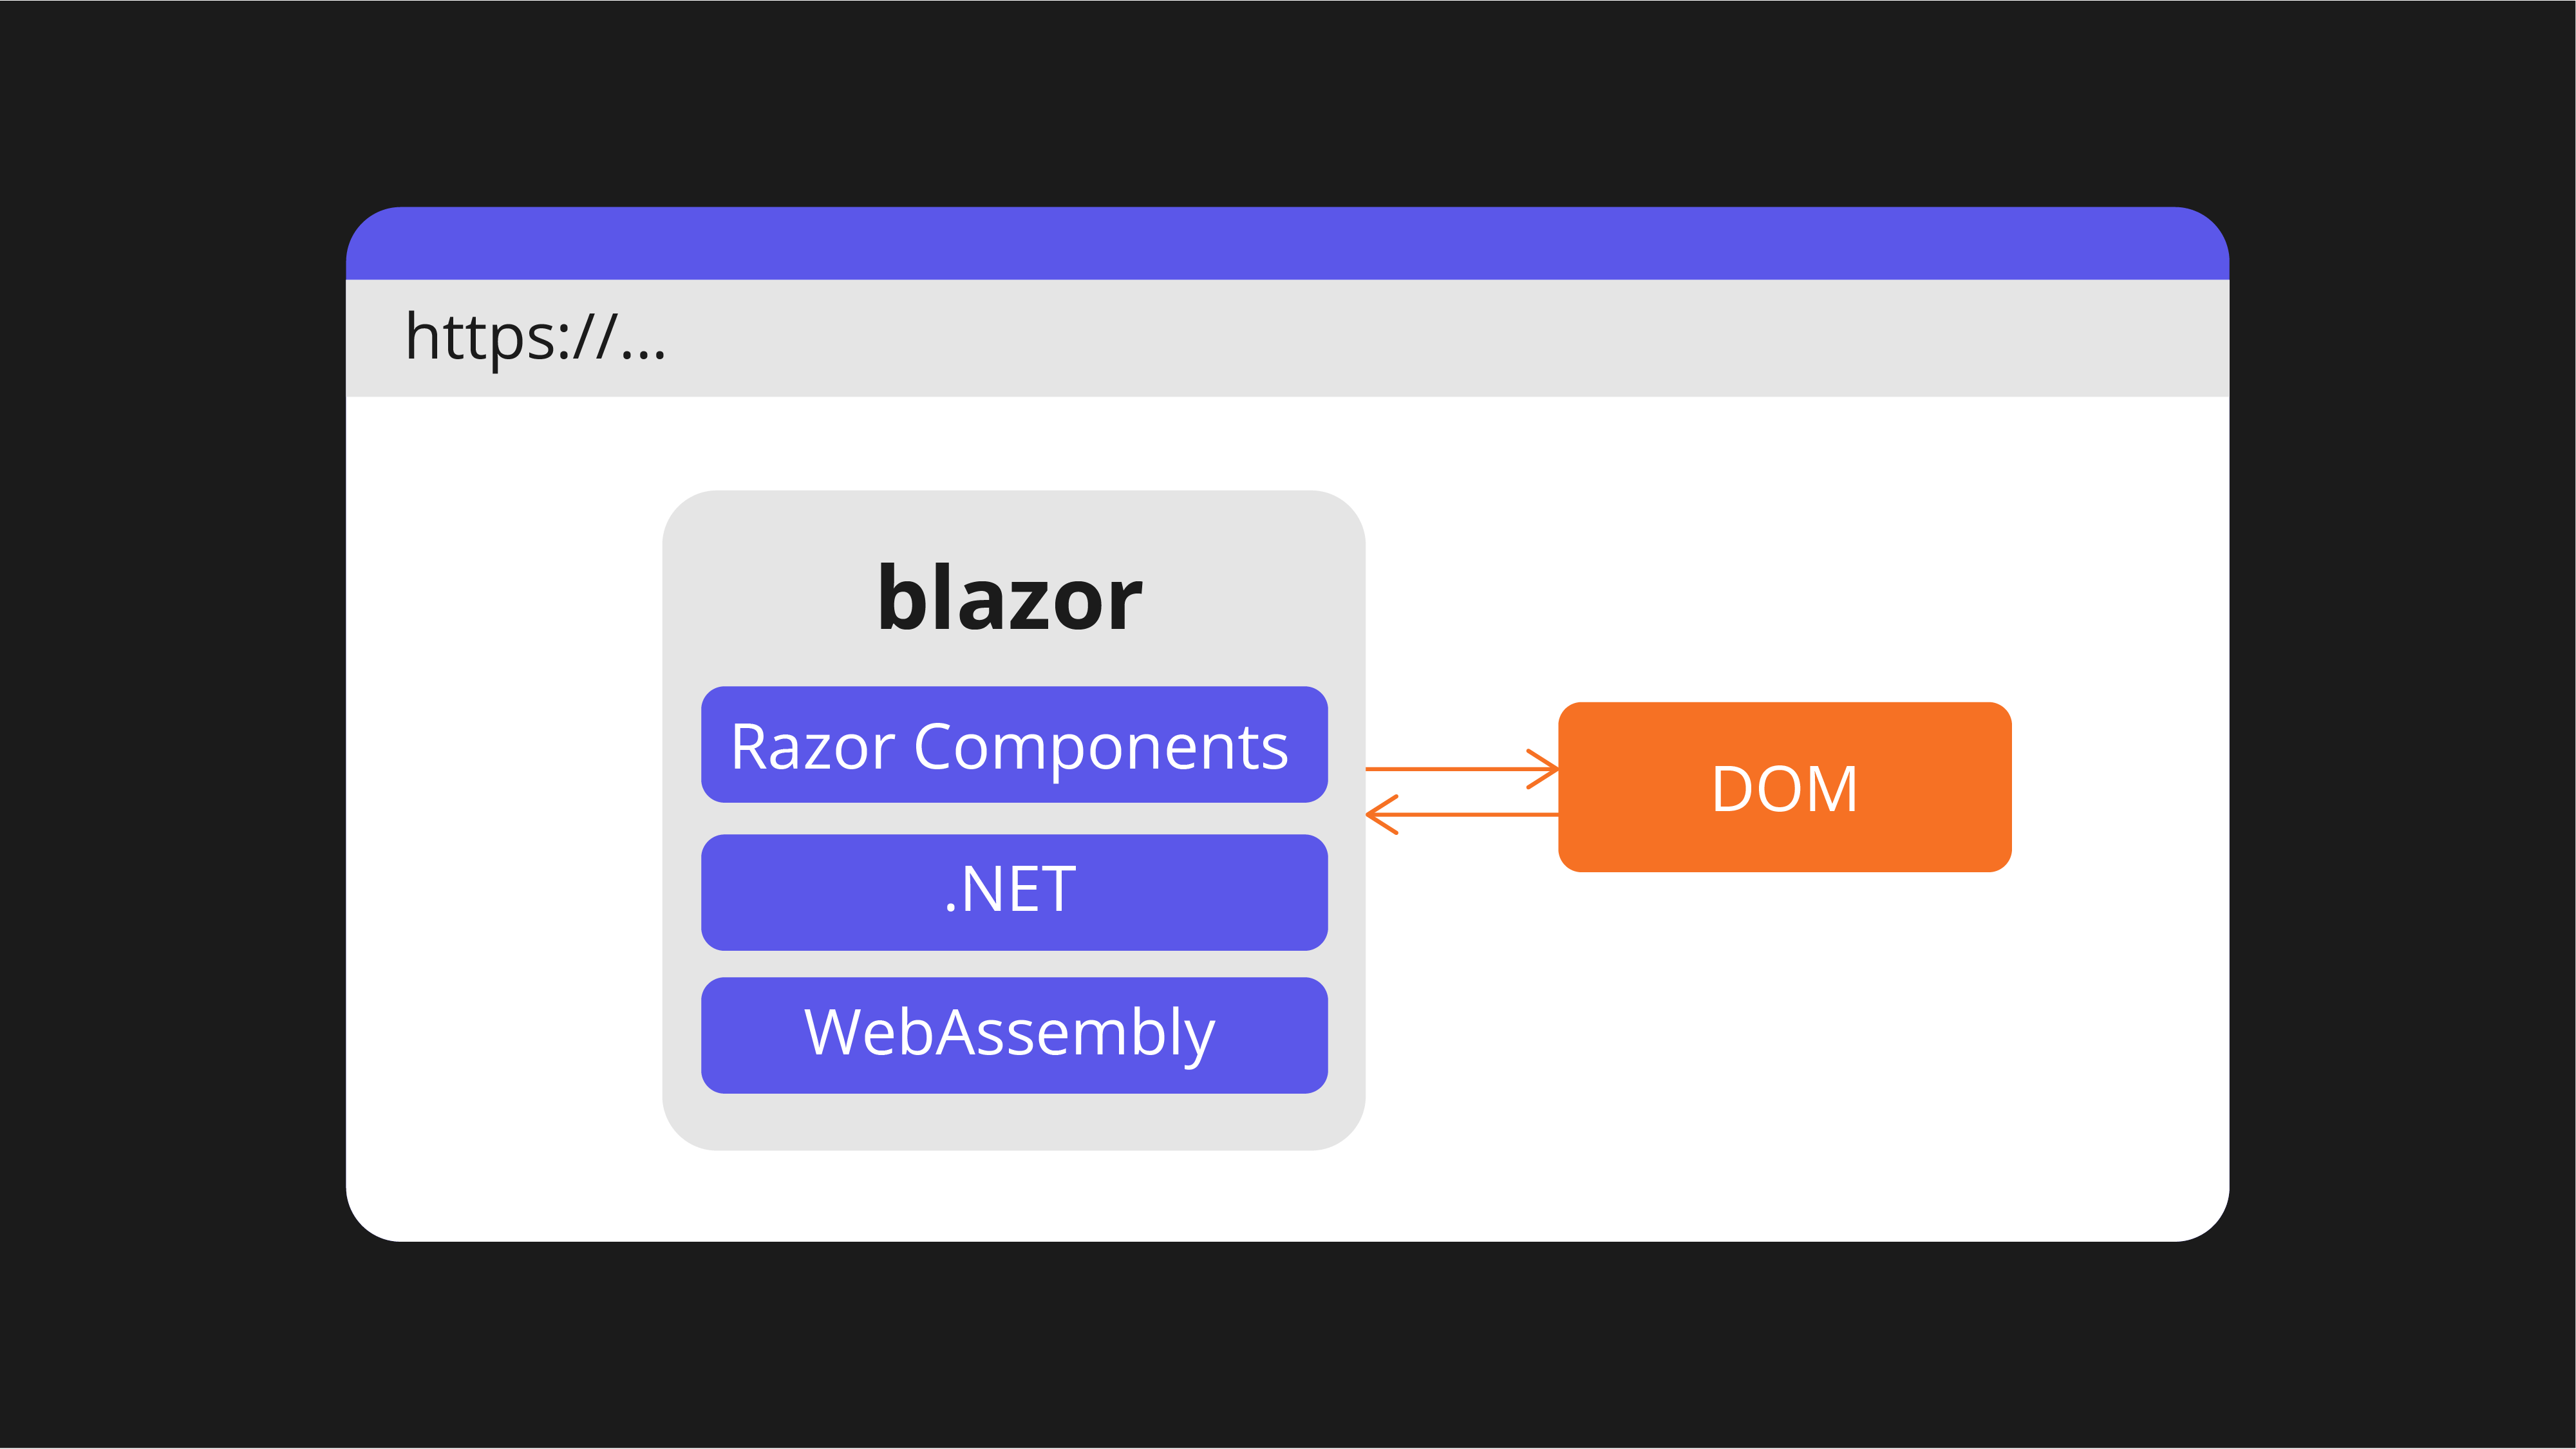
Blazor WebAssembly
Blazor WebAssembly apps execute directly in the browser using a WebAssembly-based .NET runtime. This model mirrors the functionality of front-end JavaScript frameworks like Angular or React but with the advantage of using C#. The runtime, app assembly, and dependencies are downloaded to the client, eliminating the need for browser plugins or extensions.
Key characteristics of the Blazor WebAssembly hosting model:
- Runs natively in the browser without the need for plug-ins
- Allows integration with existing .NET libraries.
- Deployment to static site hosting solutions such as GitHub Pages or Azure Static Website Hosting is feasible.
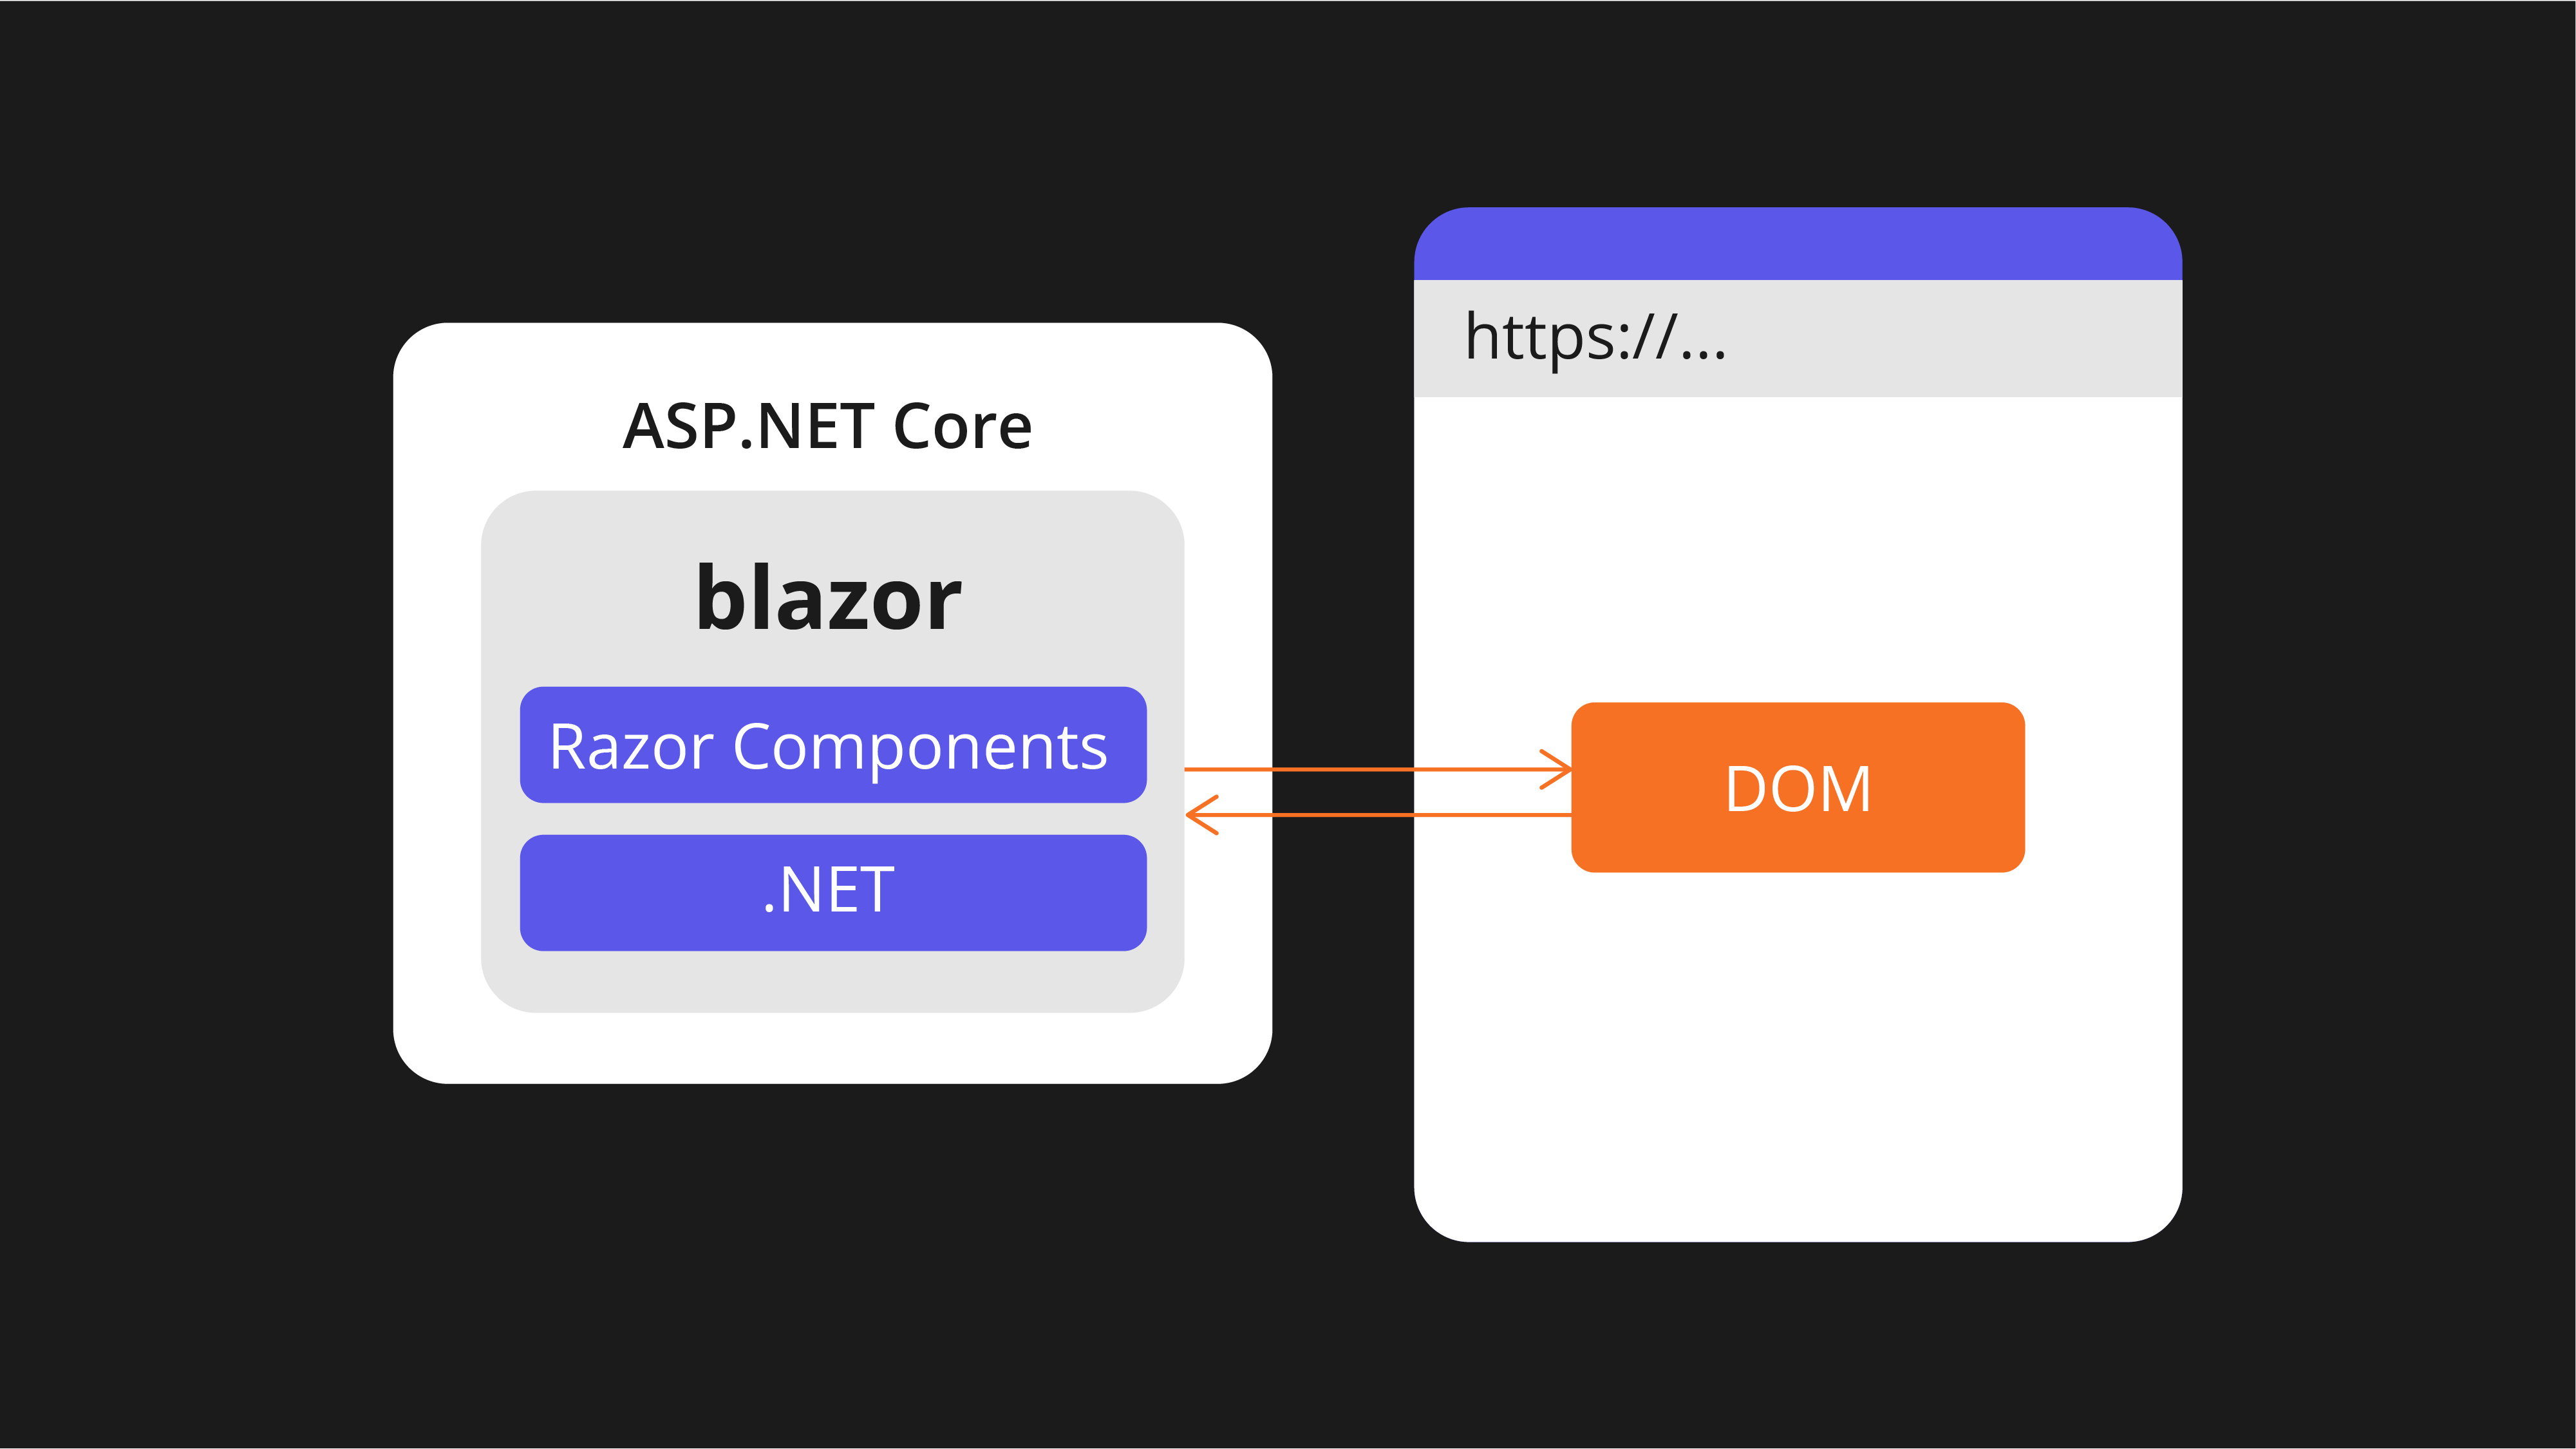
Blazor Server
In Blazor Server apps, components run on the server instead of the client. UI events are dispatched to the server over a real-time connection (SignalR), where components render, and a calculated UI diff is sent back to the browser for application to the DOM. This model shares conceptual similarities with ASP.NET Web Forms AJAX and the UpdatePanel control.
Key characteristics of the Blazor Server hosting model:
- UI events are sent to the server over a real-time connection.
- UI state is maintained on the server.
- Supports thin clients and browsers without WebAssembly support.
- Requires an active connection with the client for app functionality.
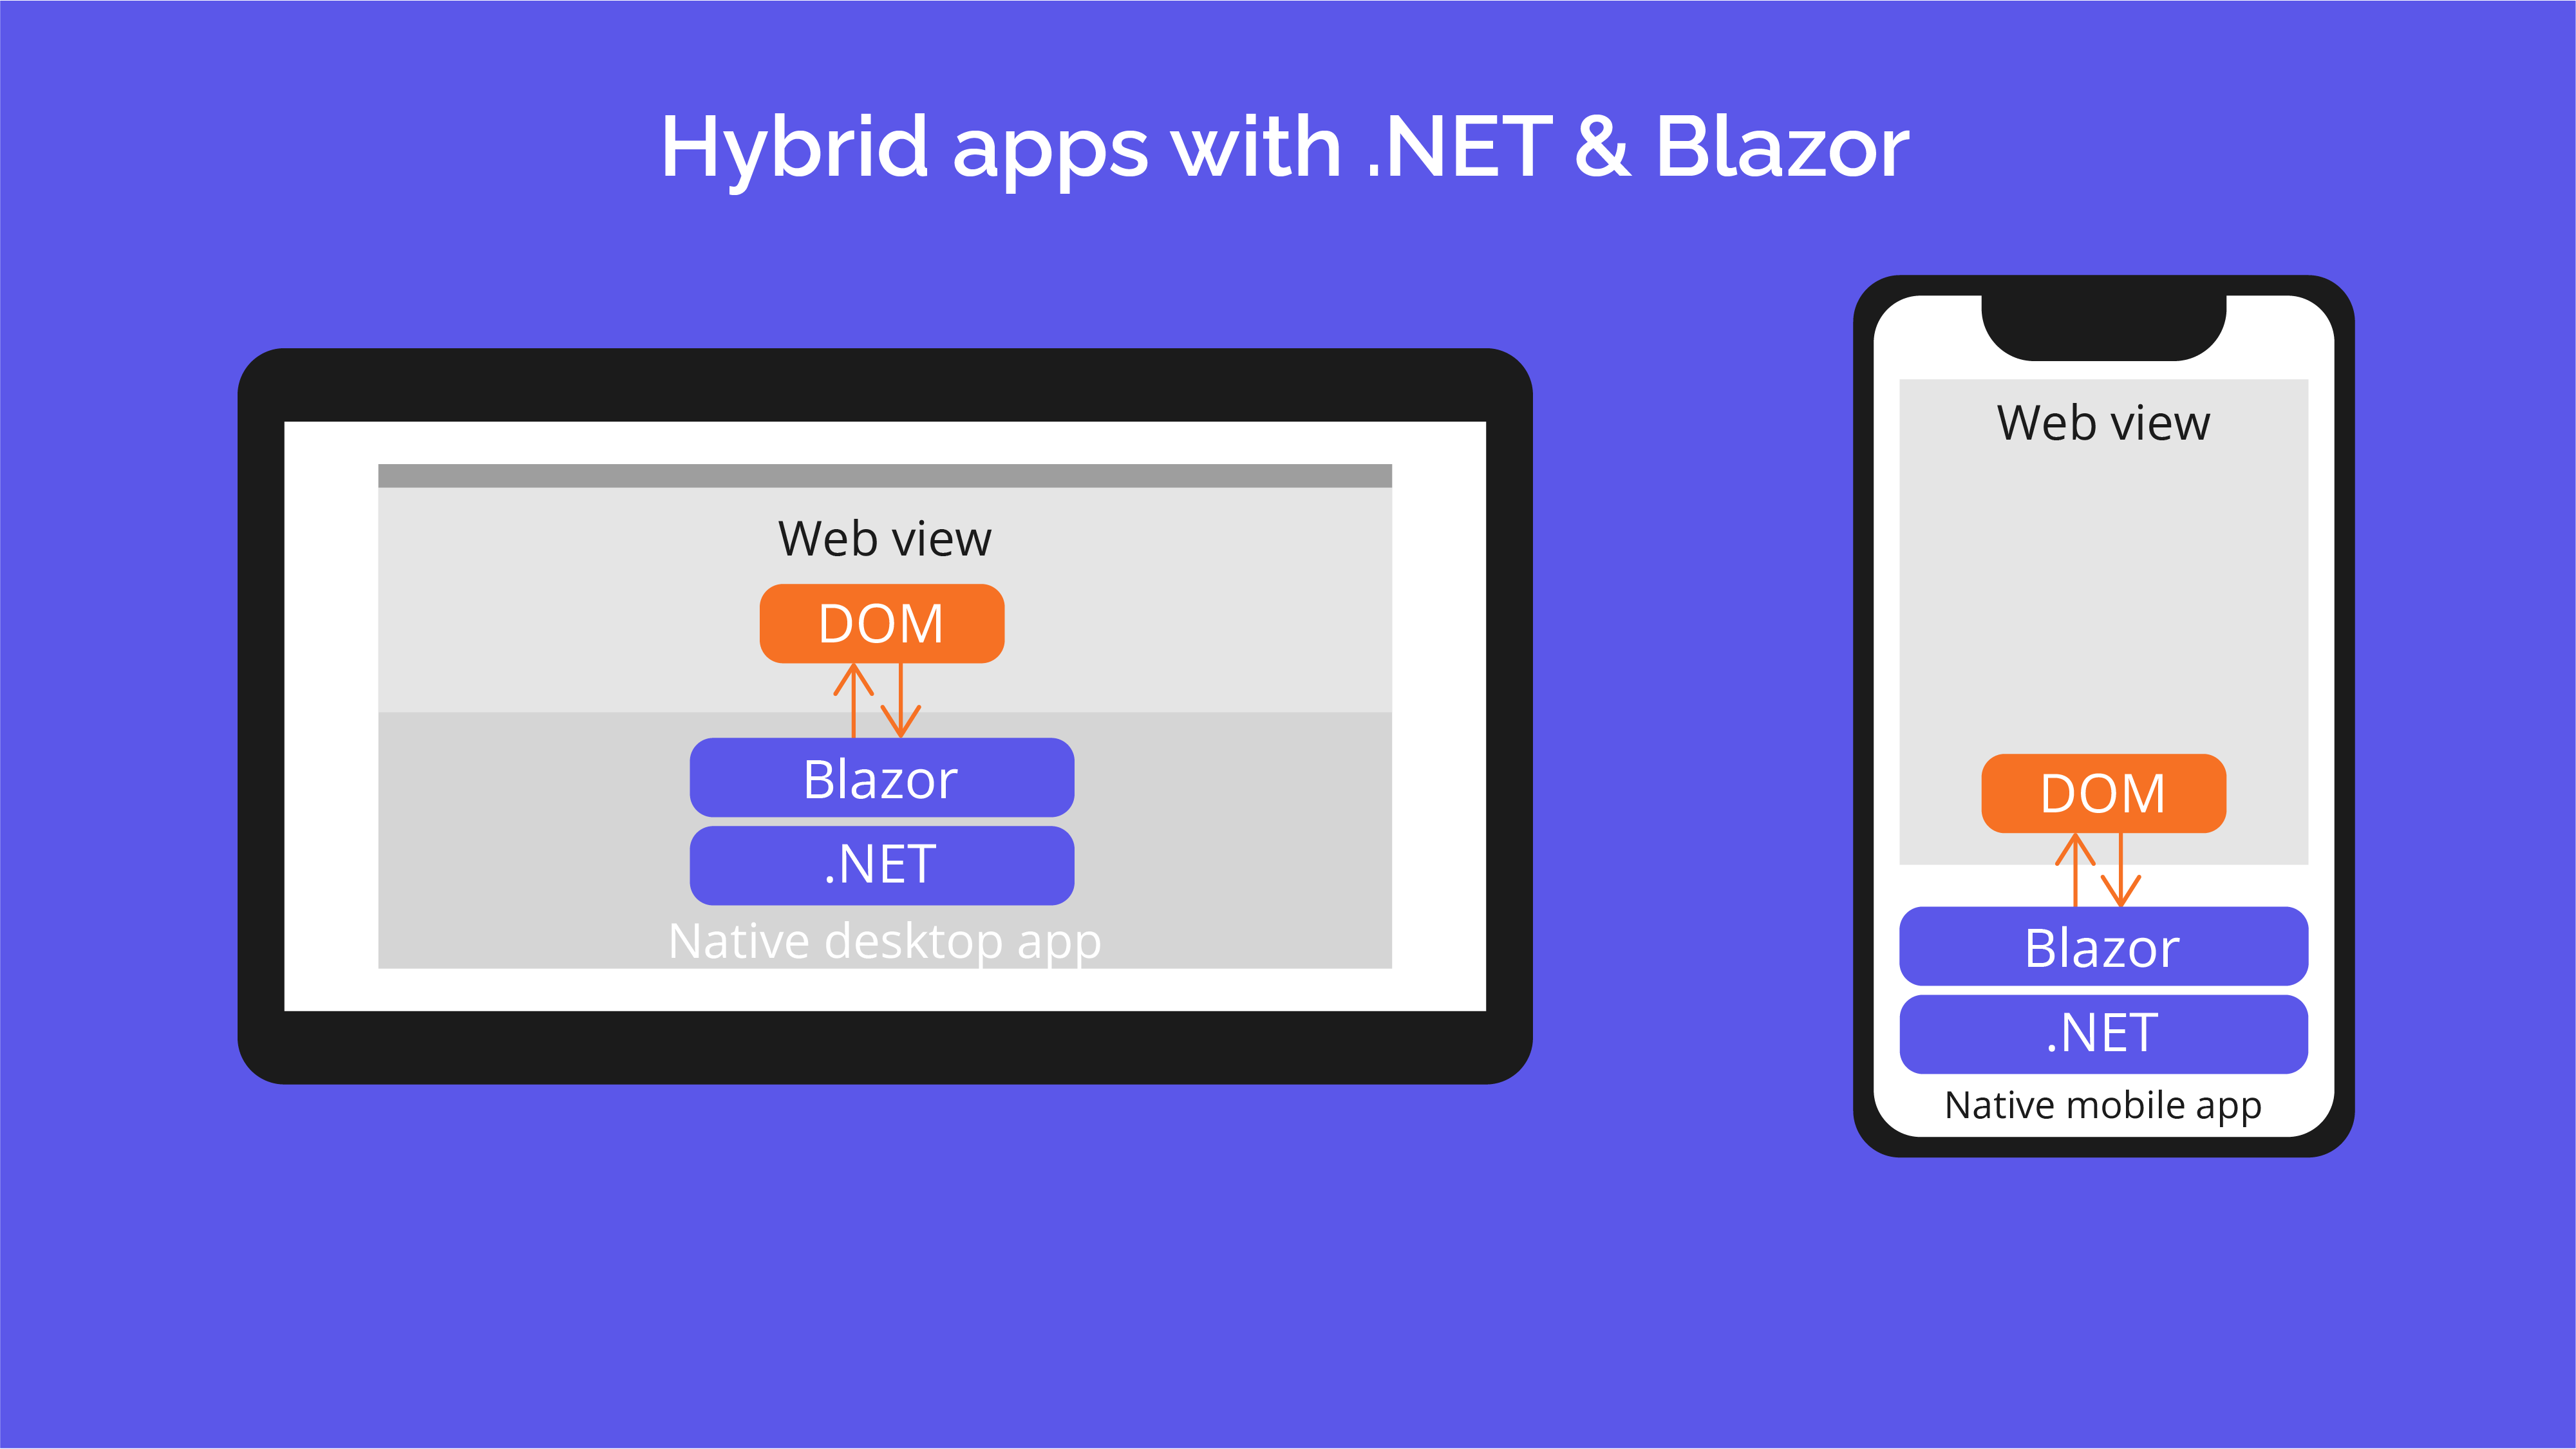
Blazor Hybrid
Blazor extends its reach to native client apps with the Blazor Hybrid model. In this approach, Razor components operate directly within the native app environment, providing a harmonious blend of native functionalities and web technologies. Through an embedded WebView control, the app renders a web UI using HTML and CSS, facilitated by a local interop channel.
Key characteristics of the Blazor Hybrid hosting model
- Component reusability enables seamless sharing of existing components across mobile, desktop, and web platforms, ensuring efficient development practices.
- Developers can use their web development skills and resources to facilitate a smooth transition into native app development, promoting cross-disciplinary collaboration.
- Access to native capabilities allows Blazor Hybrid apps to harness functionalities beyond the constraints of the web platform.
It is also important to remember that in this model, developers need separate native client apps for each target platform and potential installation overhead.
.NET 8 and New Render Modes
.NET 8 introduced the concept of render modes, transforming Blazor into a complete web UI framework for developing applications on either the client or sever. This functionality is enabled by a variety of render modes.
Static Server-Side Rendering (SSR)
In this mode, HTML is generated on the server in response to a request, resulting in lightning-fast application loading with no interactive processing. It makes Blazor a good option for building content-rich public websites.
Interactive Server
This mode relies on SSR but allows you to rendering components using the server-side rendering capabilities of the Blazor Server hosting model described earlier. The server orchestrates user interactions in real time through a dynamic connection with the browser.
Interactive WebAssembly
This mode relies on SSR but allows you to render components using the client-side rendering capabilities of the Blazor WebAssembly hosting model described earlier. It provides capabilities for creating interactive components which run natively on the client.
Interactive Auto
Interactive Auto rendering relies on SSR but takes a progessive approach to rendering a component at runtime. Initially, it employs Interactive Server rendering for rendering a component. In parallel, the .NET runtime and app bundle are discreetly downloaded to the client, where the component will be rendered using Blazor WebAssembly on subsequent visits. Auto mode is intended to provide the “best of both worlds” - immediate rendering of content generated on the server coupled with responsive rendering on the client using the native capabilities of the browser.
What option to choose?
With the expansion of Blazor's application deployment models and the introduction of new rendering modes in .NET 8, developers are faced with a large number of options. Each option can serve different purposes, meeting different application needs. Generally speaking, here are some considerations for choosing.
Blazor Server can be perfect for highly interactive applications where components run on the server, dispatching UI events in real-time. With the UI state maintained on the server, it supports thin clients and browsers without WebAssembly support, making it a suitable choice for various scenarios.
Blazor WebAssembly is a good solution if you're looking for a client-side execution environment that mirrors the functionality of popular JavaScript frameworks like Angular or React, but with the power of C#, Blazor WebAssembly is the way to go.
For an approach that blends web technologies with native client apps, consider the Blazor Hybrid hosting model. This option allows Razor components to run directly within the native app, offering a harmonious mix of native and web functionalities. The Blazor Hybrid model is ideal for reusing components across mobile, desktop, and web platforms, leveraging web development skills for native app development.
As for the render modes, here are some thoughts:
Static Server-Side Rendering (SSR) is more suitable for lightning-fast application loading with server-generated content, making it a strong contender for building public-facing web applications and websites.
Interactive Server is good for components where you want to engage users in real-time interactions but do not want to deal with the initial latency of Blazor WebAssembly.
Interactive WebAssembly is a compelling choice when you want to engage users in real-time interactions using the performance and scalability of Blazor WebAssembly,
Interactive Auto rendering mode is suitable for Blazor applications where you want to engage users in real-time interactions and want to optimize both the initial user experience as well as run-time performance and scalability. This mode can become a universal choice that dynamically determines the type of rendering at runtime, adapting to the characteristics of the environment and user preferences.
The choice depends on your specific project requirements. Whether you prioritize client-side interactivity, server-side efficiency, or a harmonious blend of both, the diverse options offered by Blazor's hosting models and render modes provide flexibility and power to developers. But if you need some assistance in choosing the Devessence team will be happy to help. Let’s talk!
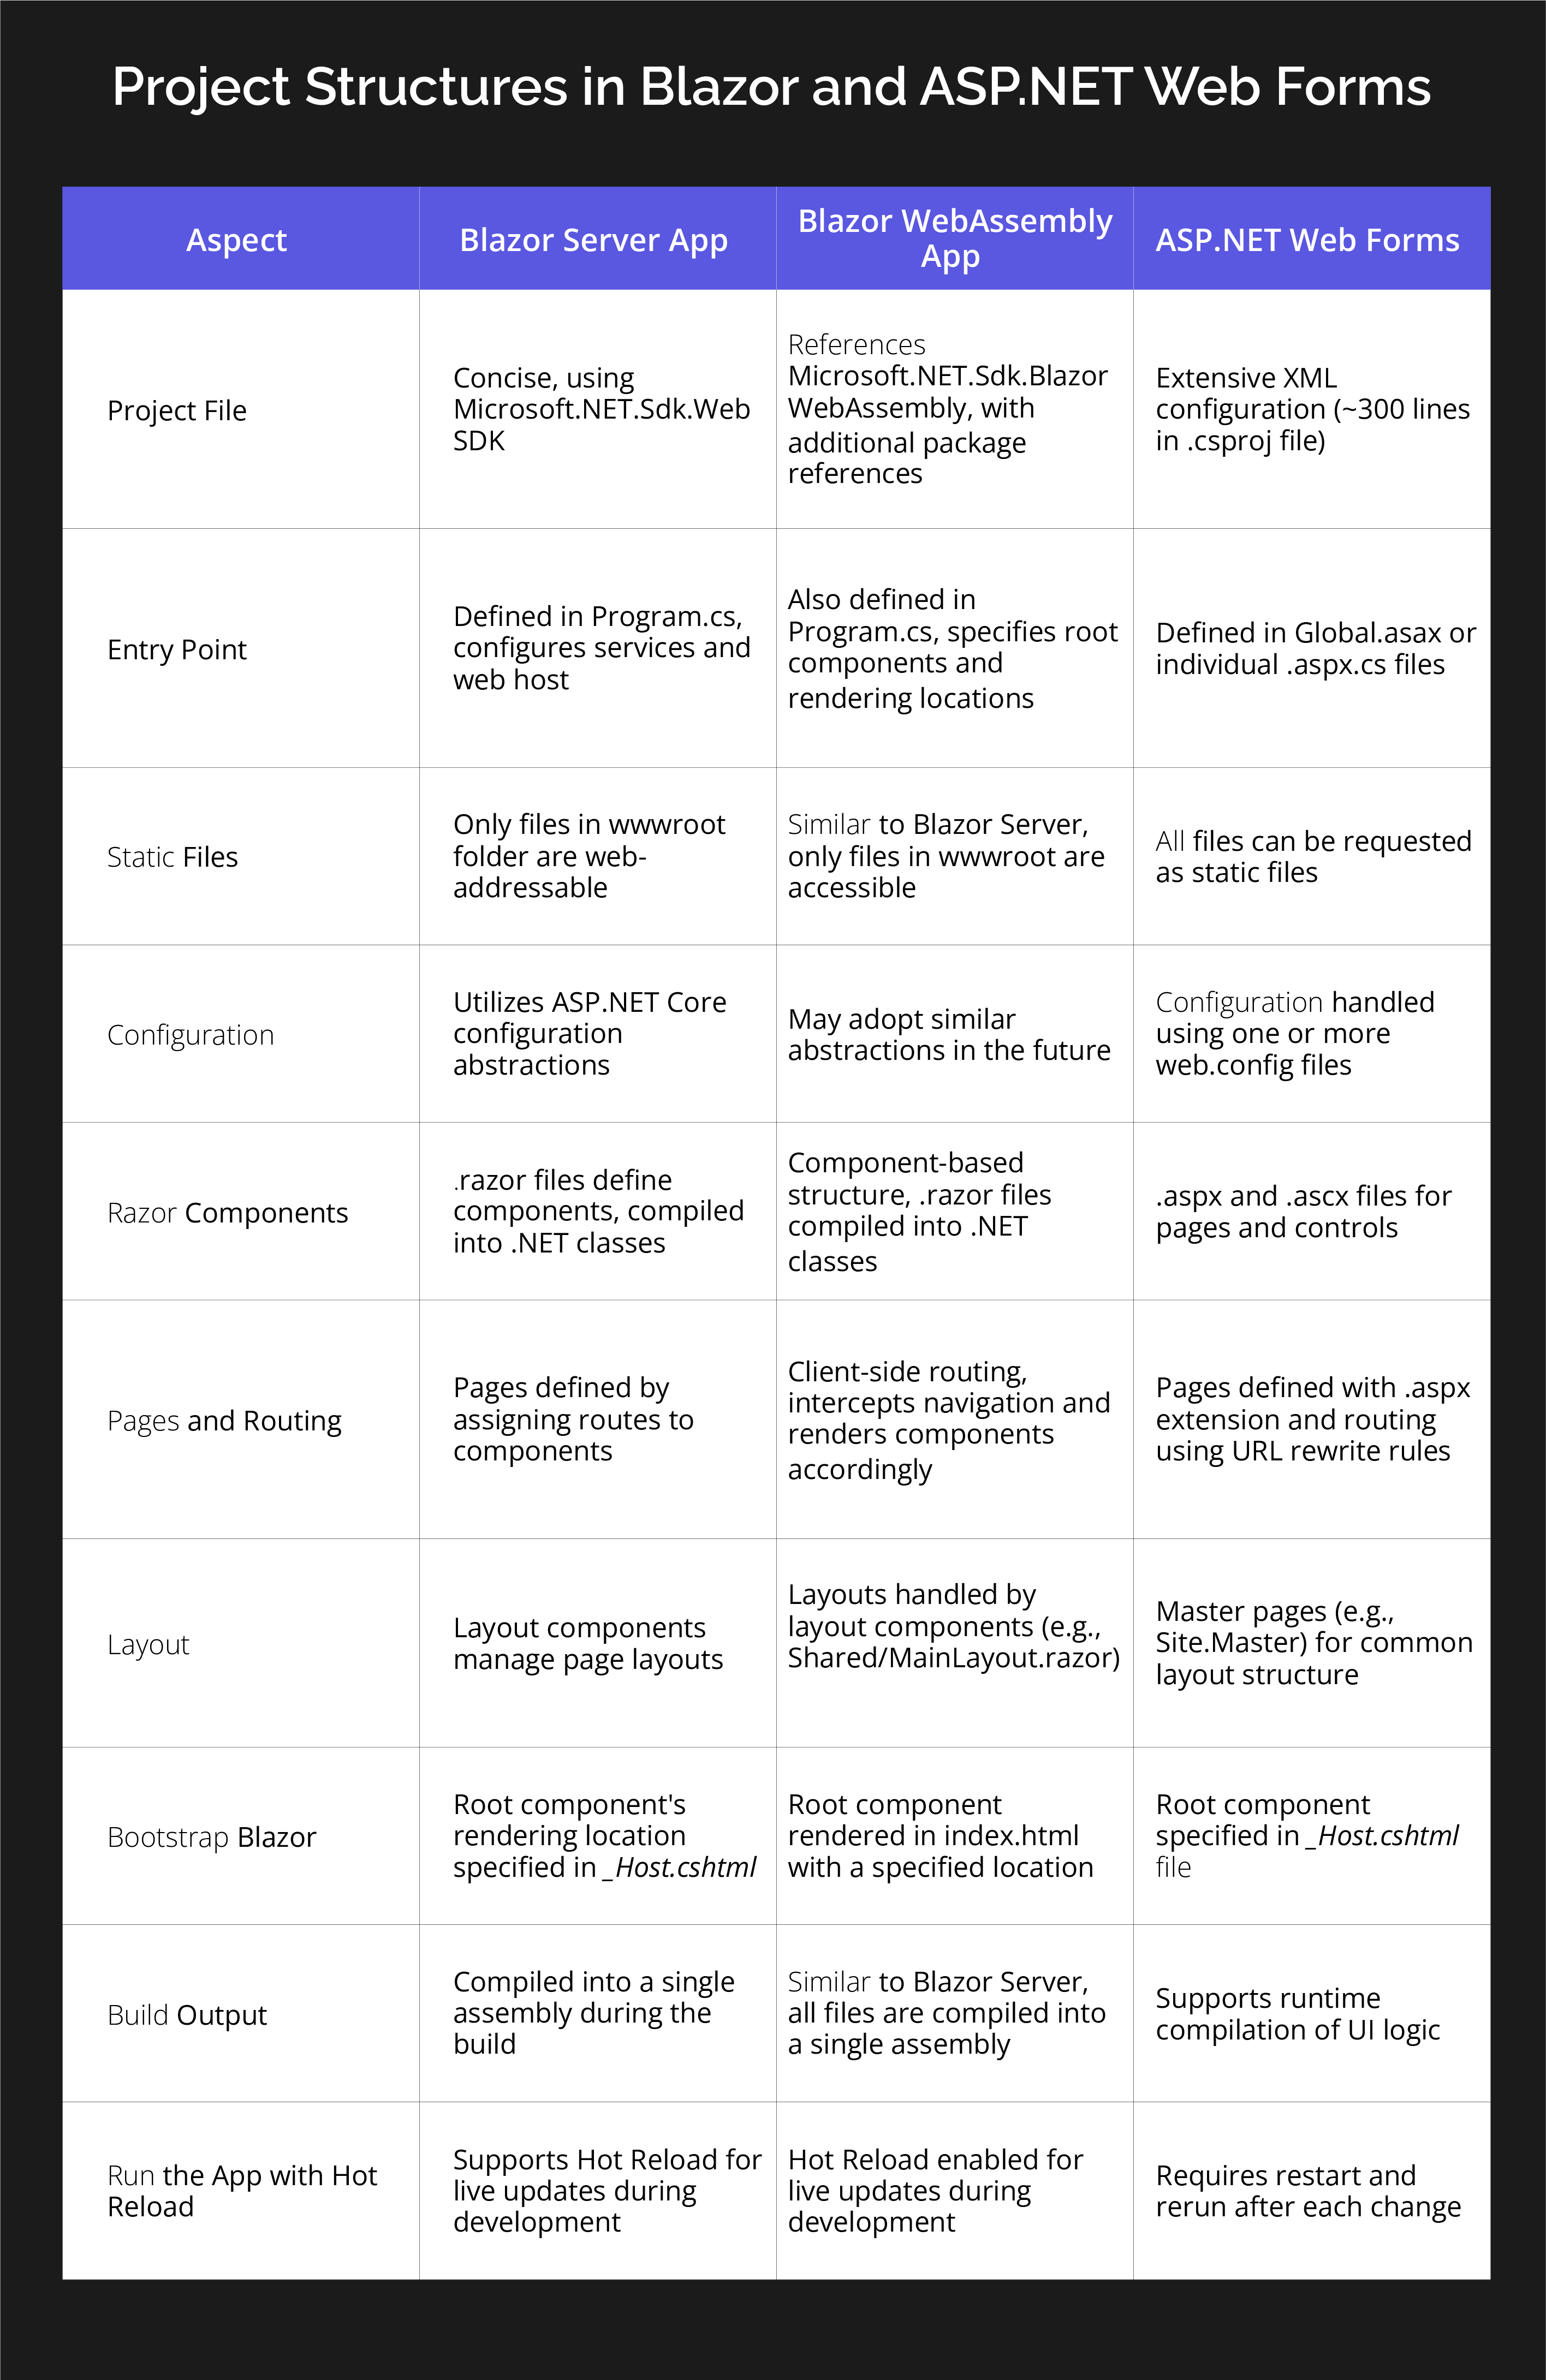
Project Structures in Blazor and ASP.NET Web Forms
Let's take a look at the structural differences between Blazor (both Server and WebAssembly) and ASP.NET Web Forms in various aspects of project development.
One of the appealing aspects of ASP.NET Web Forms lies in its ability to encapsulate reusable fragments of user interface (UI) code into handy, reusable UI controls. Tailor-made user controls can be crafted using .ascx files within the markup, or you can construct sophisticated server controls in code with comprehensive designer support.
Reusable UI Components in Blazor
ASP.NET Web Forms provide the ability to encapsulate reusable fragments of user interface (UI) code into reusable UI controls. You can create custom user controls using .ascx files within the markup or create advanced server controls in code with comprehensive designer support.
The concept of UI encapsulation through components is relevant for Blazor as well. Components in Blazor can maintain their state, handle events, and manage their lifecycle. Razor components support data binding, event handling, and capturing references to other components or elements.
Components in Blazor are typically defined in a .razor file using Razor syntax. It is a lightweight markup templating language for combining HTML and C# to define rendering logic. Razor components use directives to control aspects like namespace, base class, interfaces, routes, and more. Some directives in Blazor have counterparts in ASP.NET Web Forms.
Data binding
Blazor provides data binding with the @bind directive, enabling two-way communication between UI components and their state. Component parameters can be bound using attributes, and you can leverage query string parameters for dynamic content.
Event handling
Event handling in Blazor involves using the @on{event} directive to register handlers for UI events. It supports both synchronous and asynchronous event handlers, allowing for various interactions with the user interface.
Component lifecycle
Razor components in Blazor have a well-defined lifecycle, including initialization, parameter setting, rendering, and disposal. Lifecycle methods such as OnInitialized, OnParametersSet, and OnAfterRender provide hooks for managing component behavior at different stages.
Templated components
Blazor supports templated components, allowing the definition of RenderFragments to represent chunks of Razor markup. Components can capture child content and define template parameters for customization.
Code-behind
While Razor components are typically authored in a single .razor file, it's possible to use code-behind by separating code and markup into different files. Code-behind files provide a way to organize and structure component logic.
As you can see now, Blazor is a versatile framework for building reusable UI components. It offers a rich set of features for data binding, event handling, and component lifecycle management.
Pages, Routing, and Layouts in ASP.NET Web Forms and Blazor
ASP.NET Web Forms app is composed of pages defined in .aspx files. Here are other things to know about pages in ASP.NET Web Forms:
- In this case, the page address is based on the physical file path.
- Browser requests result in server-side rendering, including HTML markup and server controls.
- NET Web Forms utilizes Master Pages for layout, which are defined in .master files.
- Navigation involves returning a redirect response to the browser.
In the case of Blazor, pages are components defined in .razor files, each with specified routes. Here's what you need to know about them.
- Client-side routing occurs without a specific server request.
- The root Router component manages navigation requests and forwards them.
- Supports deep linking.
- Navigation is managed by the NavigationManager service.
- Page layout is handled by layout components using the @layout directive.
- Supports nested layouts.
- Host page renders initial HTML content; components can't render <script> tags.
Blazor supports deep linking – a process where the browser sends a request to a particular route within the application, not to the root of the app. When requests for deep links reach the server, Blazor routes them to the appropriate client-side component, ensuring seamless navigation to the specified route.
To create pages in Blazor, you just need to create a component and add the @page Razor directive to specify the route.
Routing
The @page directive accepts a single parameter, serving as the route template for that specific component. For example: @page "/counter"
It's essential to note that the route template parameter is mandatory. Unlike ASP.NET Web Forms, Blazor doesn't deduce the component's route from its file location, although this feature may be incorporated in future updates.
The syntax for the route template aligns with the basic routing syntax used in ASP.NET Web Forms. Route parameters are indicated within braces. Blazor automatically binds route values to component parameters with matching names (case-insensitive). Additionally, you have the option to impose constraints on the route parameter values.
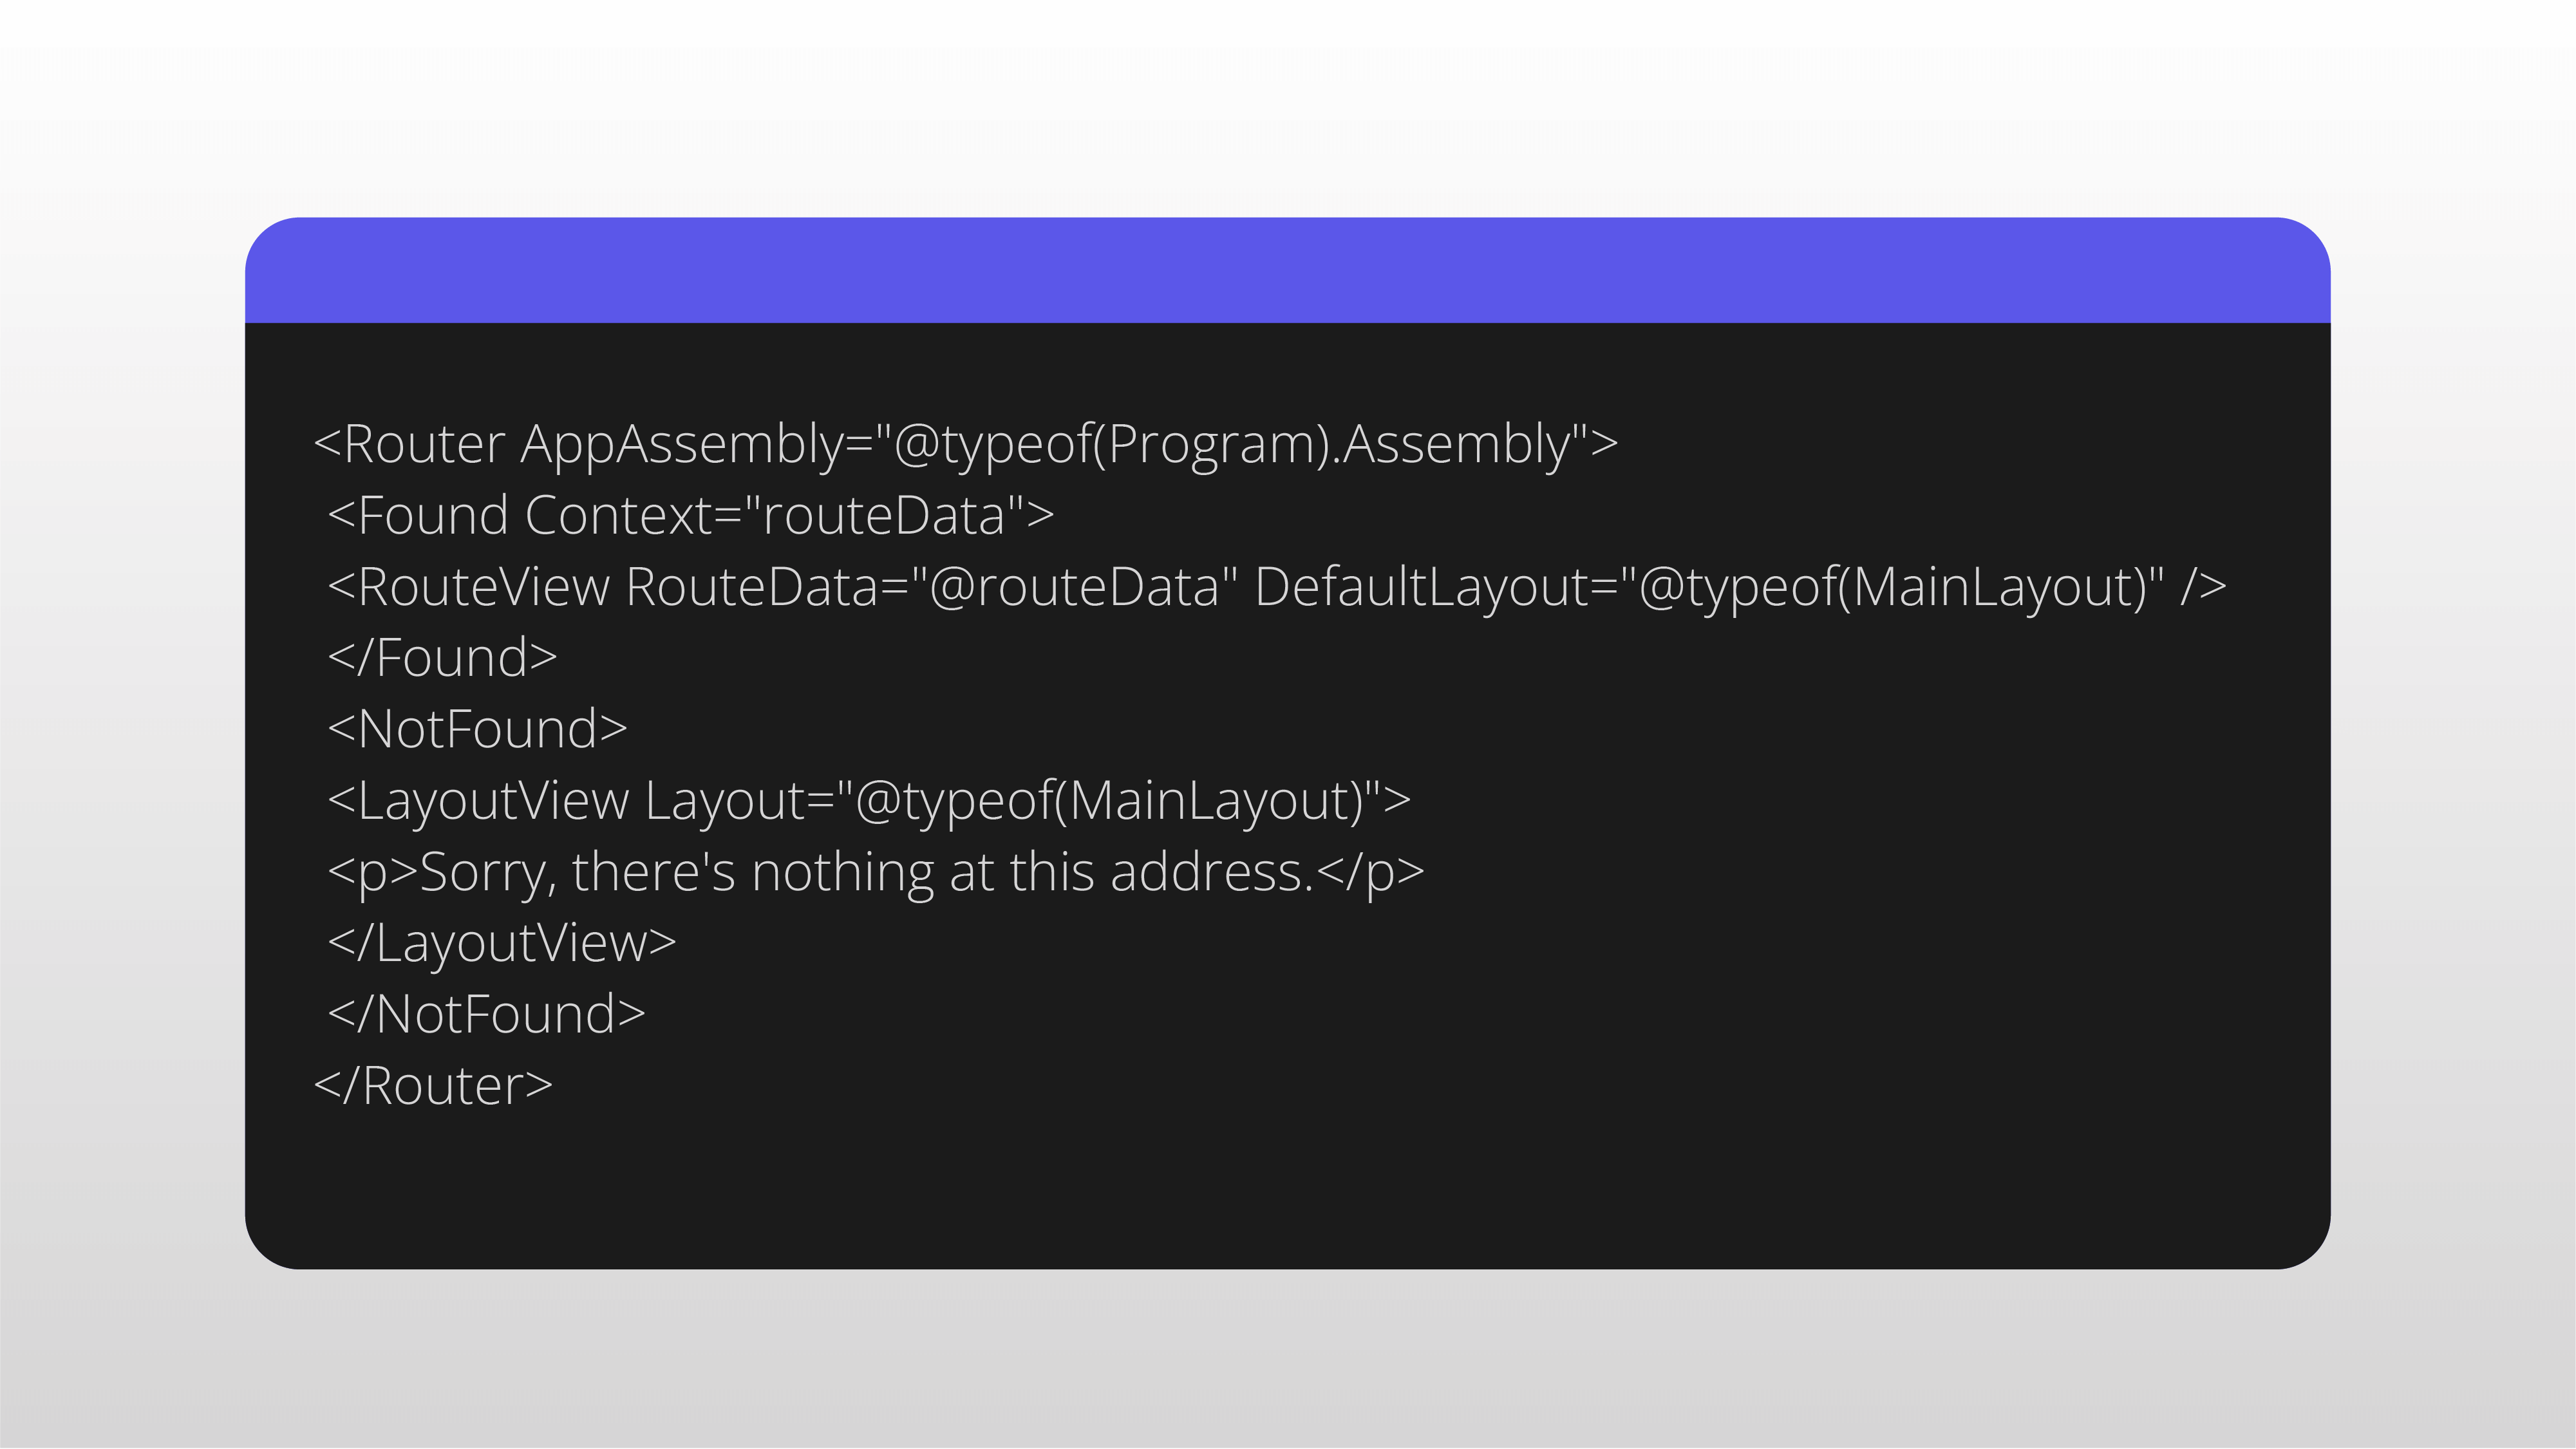
Routing in Blazor is managed by the Router component, typically in the app's root component (App.razor). This component
- Discovers routable components in the specified AppAssembly and in the
- optionally specified AdditionalAssemblies.
- Intercepts navigation.
- RouteView component renders the matched component specified by the RouteData, with an optional layout.
- LayoutView component renders child content within the specified layout.
Navigation
In the case of ASP.NET Web Forms, initiating navigation to another page involves sending a redirect response to the browser. Contrarily, Blazor operates on a different model, which varies from the traditional request-response structure. Instead, in Blazor, you have the option to directly prompt browser navigations using the functionality available in JavaScript.
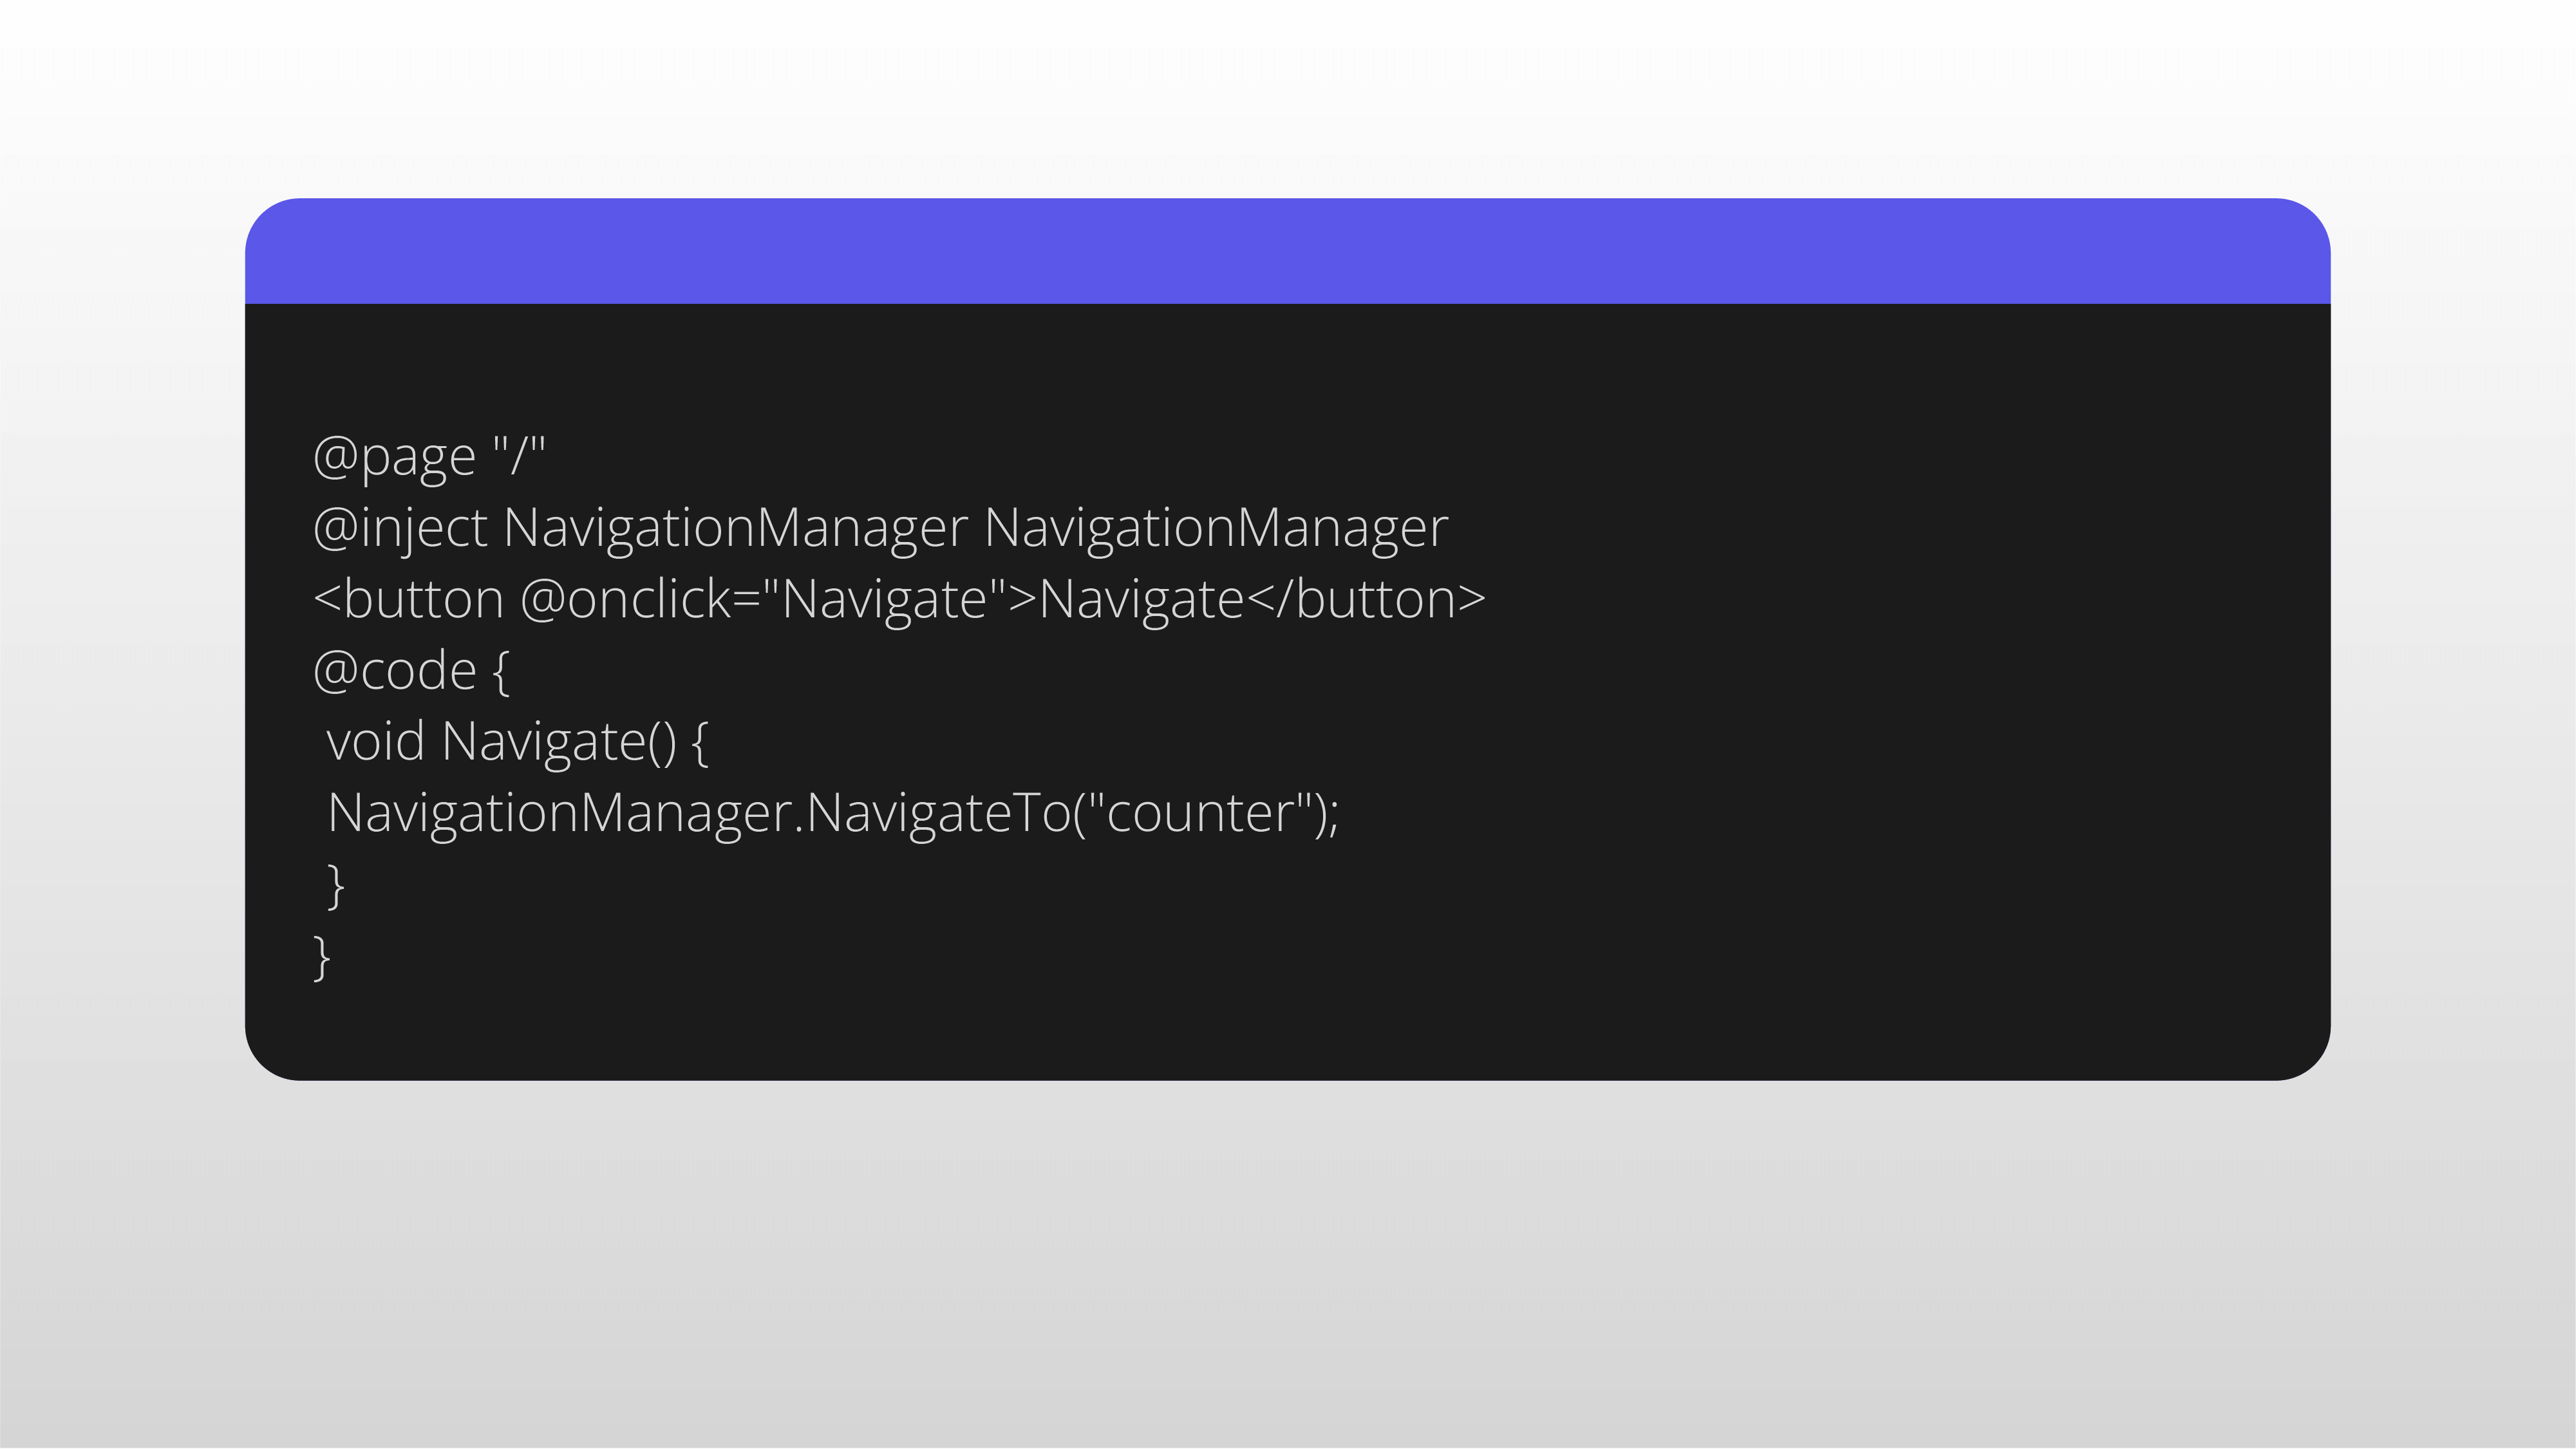
Blazor offers the NavigationManager service, which you can use to get current browser address, base address, for trigger navigations, and to get notified of address changes. You can also use the NavigateTo method to navigate to a different address.
Other things to consider
- Base URLs. Specify the base URL in the page metadata using the <base> tag for routing to work correctly. Use the ~/ syntax for server-rendered pages or explicitly specify the base URL for static HTML pages.
- Page layout. In ASP.NET Web Forms, Master Pages handle page layout. But in Blazor, layout components inherit from LayoutComponentBase, with a Body property for rendering content. You can apply layout using the @layout directive.
- Nested layouts. Blazor layouts may be nested, applying a layout component to another layout component.
- Note on script tags. Components in Blazor can't render <script> tags; they should be added to the app's host page.
State Management
In traditional Web Forms applications, state management relied on features like ViewState, Session State, Application State, and Postback. These features simplified managing the application state, but with ASP.NET Core and Blazor, there's been a shift, prompting a reevaluation of state management approaches.
ViewState for request state management
ViewState played a key role in managing content state between HTTP requests in Web Forms. In Blazor Server, an ongoing connection (circuit) maintains the app's state on the server.
While this preserves component state without browser transmission, it poses challenges like potential state loss on server restarts. It is recommended to complement in-memory state persistence with a backing data store to ensure robust data management.
Session State for state maintenance
Web Forms developers used the ISession dictionary object for user-specific information. While Session is available in ASP.NET Core and Blazor Server, it's discouraged in favor of using a data repository. Session state is non-functional if visitors opt-out of using HTTP cookies for privacy reasons.
Application State
In Web Forms, the Application object served as a cross-request repository for application-scope configuration and state. However, data didn't persist across multiple servers, resulting in state loss between restarts.
Similar to Session, it is recommended to move data to a persistent backing store accessible by multiple server instances. Volatile data can be stored in a singleton service for cross-request and cross-user accessibility.
Client-side storage
For client-side storage, two browser features are crucial:
- localStorage – scoped to the entire browser, providing persistence unless the browser is closed.
- sessionStorage – scoped to the current browser tab, persisting through tab reloads but lost if the user opens another tab or reopens the browser. Custom JavaScript or NuGet packages like Microsoft.AspNetCore.ProtectedBrowserStorage can facilitate interactions with these browser storage features.
As you can see, Blazor is introducing new approaches. Blazor Server supports a persistent connection for state management on the server, emphasizing the need for additional data stores for reliability. Client-side storage offers persistence with browser behavior in mind. The transition helped to re-evaluate state management practices to align with modern web development paradigms.
Forms and Validation
Web Forms and Blazor use different approaches for forms and validation. In ASP.NET Web Forms, validation happens using server controls like RequiredFieldValidator, CompareValidator, and RangeValidator. It supports both server and client-side validation through unobtrusive JavaScript.
In contrast, Blazor allows the sharing of validation logic between the client and server. It provides pre-built JavaScript implementations for common server validations and requires developers to write JavaScript for app-specific validation. Blazor introduces input components like InputCheckbox, InputDate, InputNumber, InputSelect, InputText, and InputTextArea.
The EditForm component in Blazor manages field data binding and user input validation during form submission. It includes input components corresponding to HTML elements, such as checkboxes, dates, numbers, selects, texts, and textareas.
Validation in Blazor involves using the EditForm component with an EditContext. Data annotation-based validation can be enabled by adding the DataAnnotationsValidator component. ValidationSummary and ValidationMessage components are used to display error summaries and messages.
Data management
Working with data is essential in ASP.NET Web Forms applications. The main focus in this case is data handling. In Web Forms you can use various techniques for this purpose:
1. Data Sources. Here, you can add special controls to a page and set up just like any other controls. Visual Studio made it easy by providing user-friendly dialogs to configure and connect these controls to your Web Forms pages.
2. ADO.NET. A low-level method for interacting with databases, utilizing Commands, DataTables, and Datasets for creating connections. However, its drawback was code rigidity due to strong coupling with specific database vendor libraries.
3. Entity Framework (EF). An object-relational mapping framework. It allows code generation for database connections, storage schemas, and interactions. With this simplification, you can focus on defining your application's business rules, leaving database management to a trusted database administrator. .NET Core has an enhanced version of the Entity Framework (EF) known as EF Core. EF Core helps you create and manage connections between your code and your database using various commands available through the dotnet ef command-line tool. Here, you can see some examples of working with the database.
–EF Code First
Use Entity Framework's "Code First" development to build your database interactions.
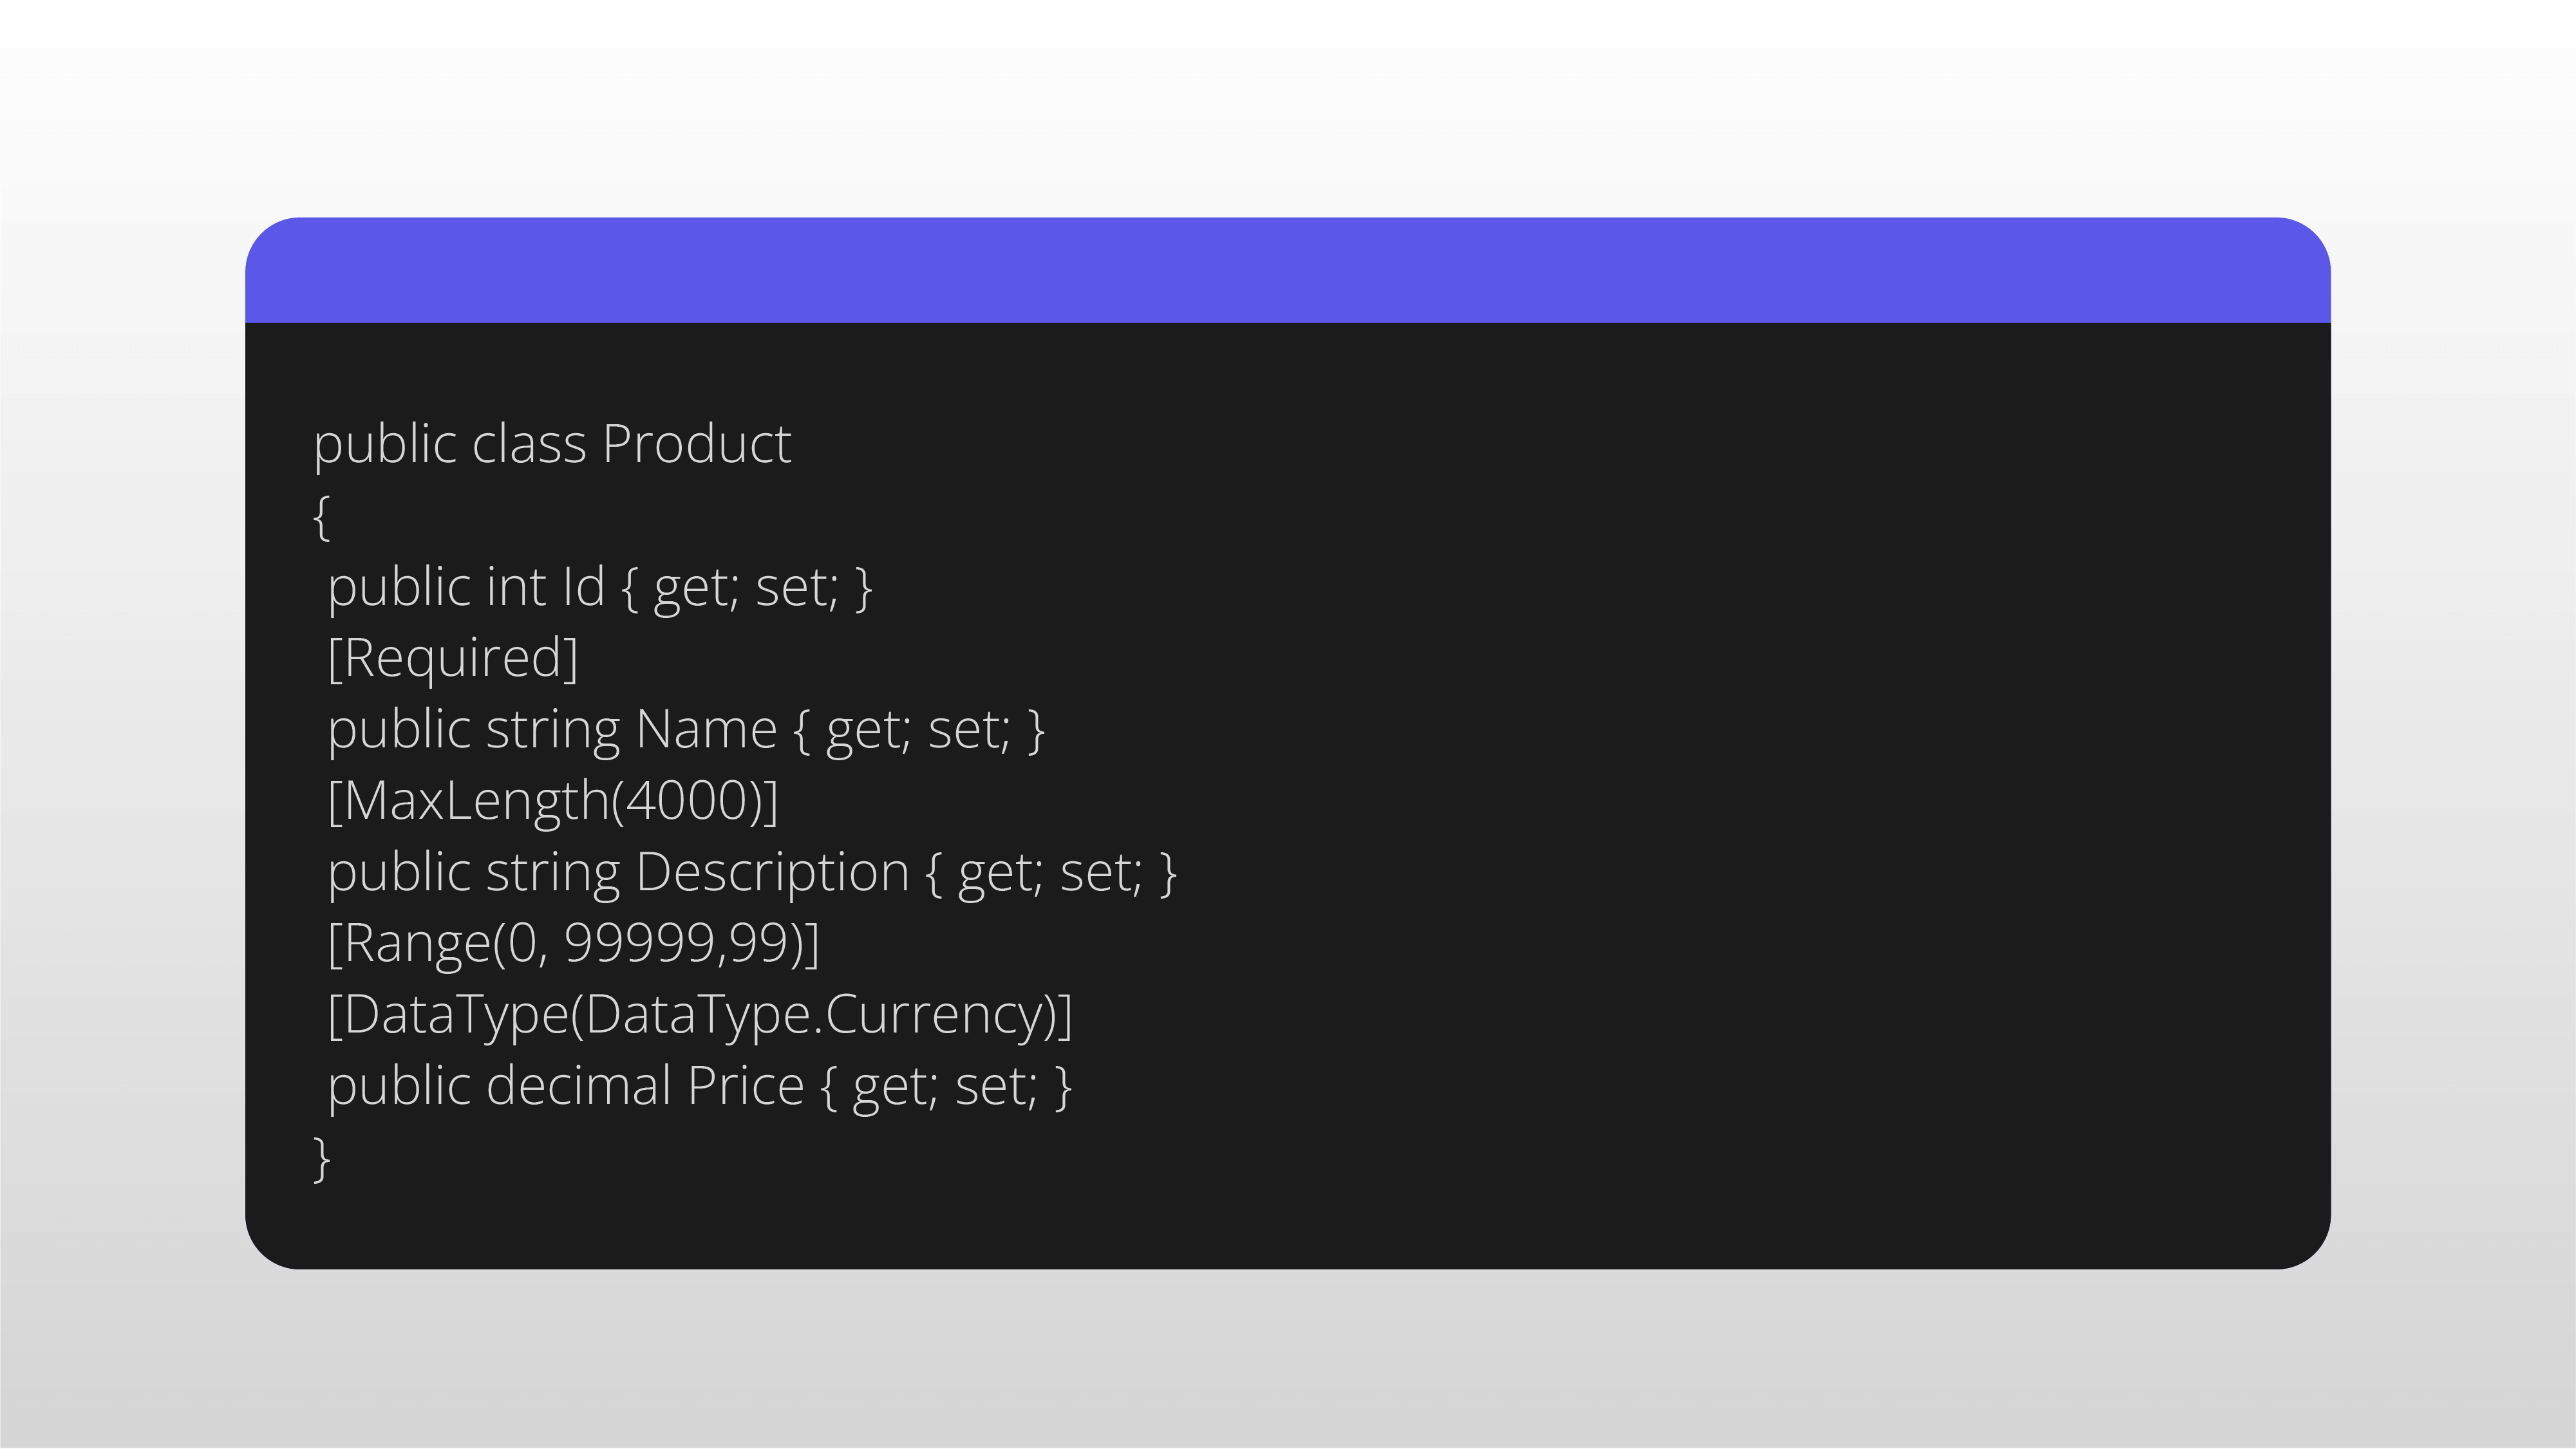
1. Define a class like this Product example for your desired objects. The class includes a primary key and additional fields with specified constraints.
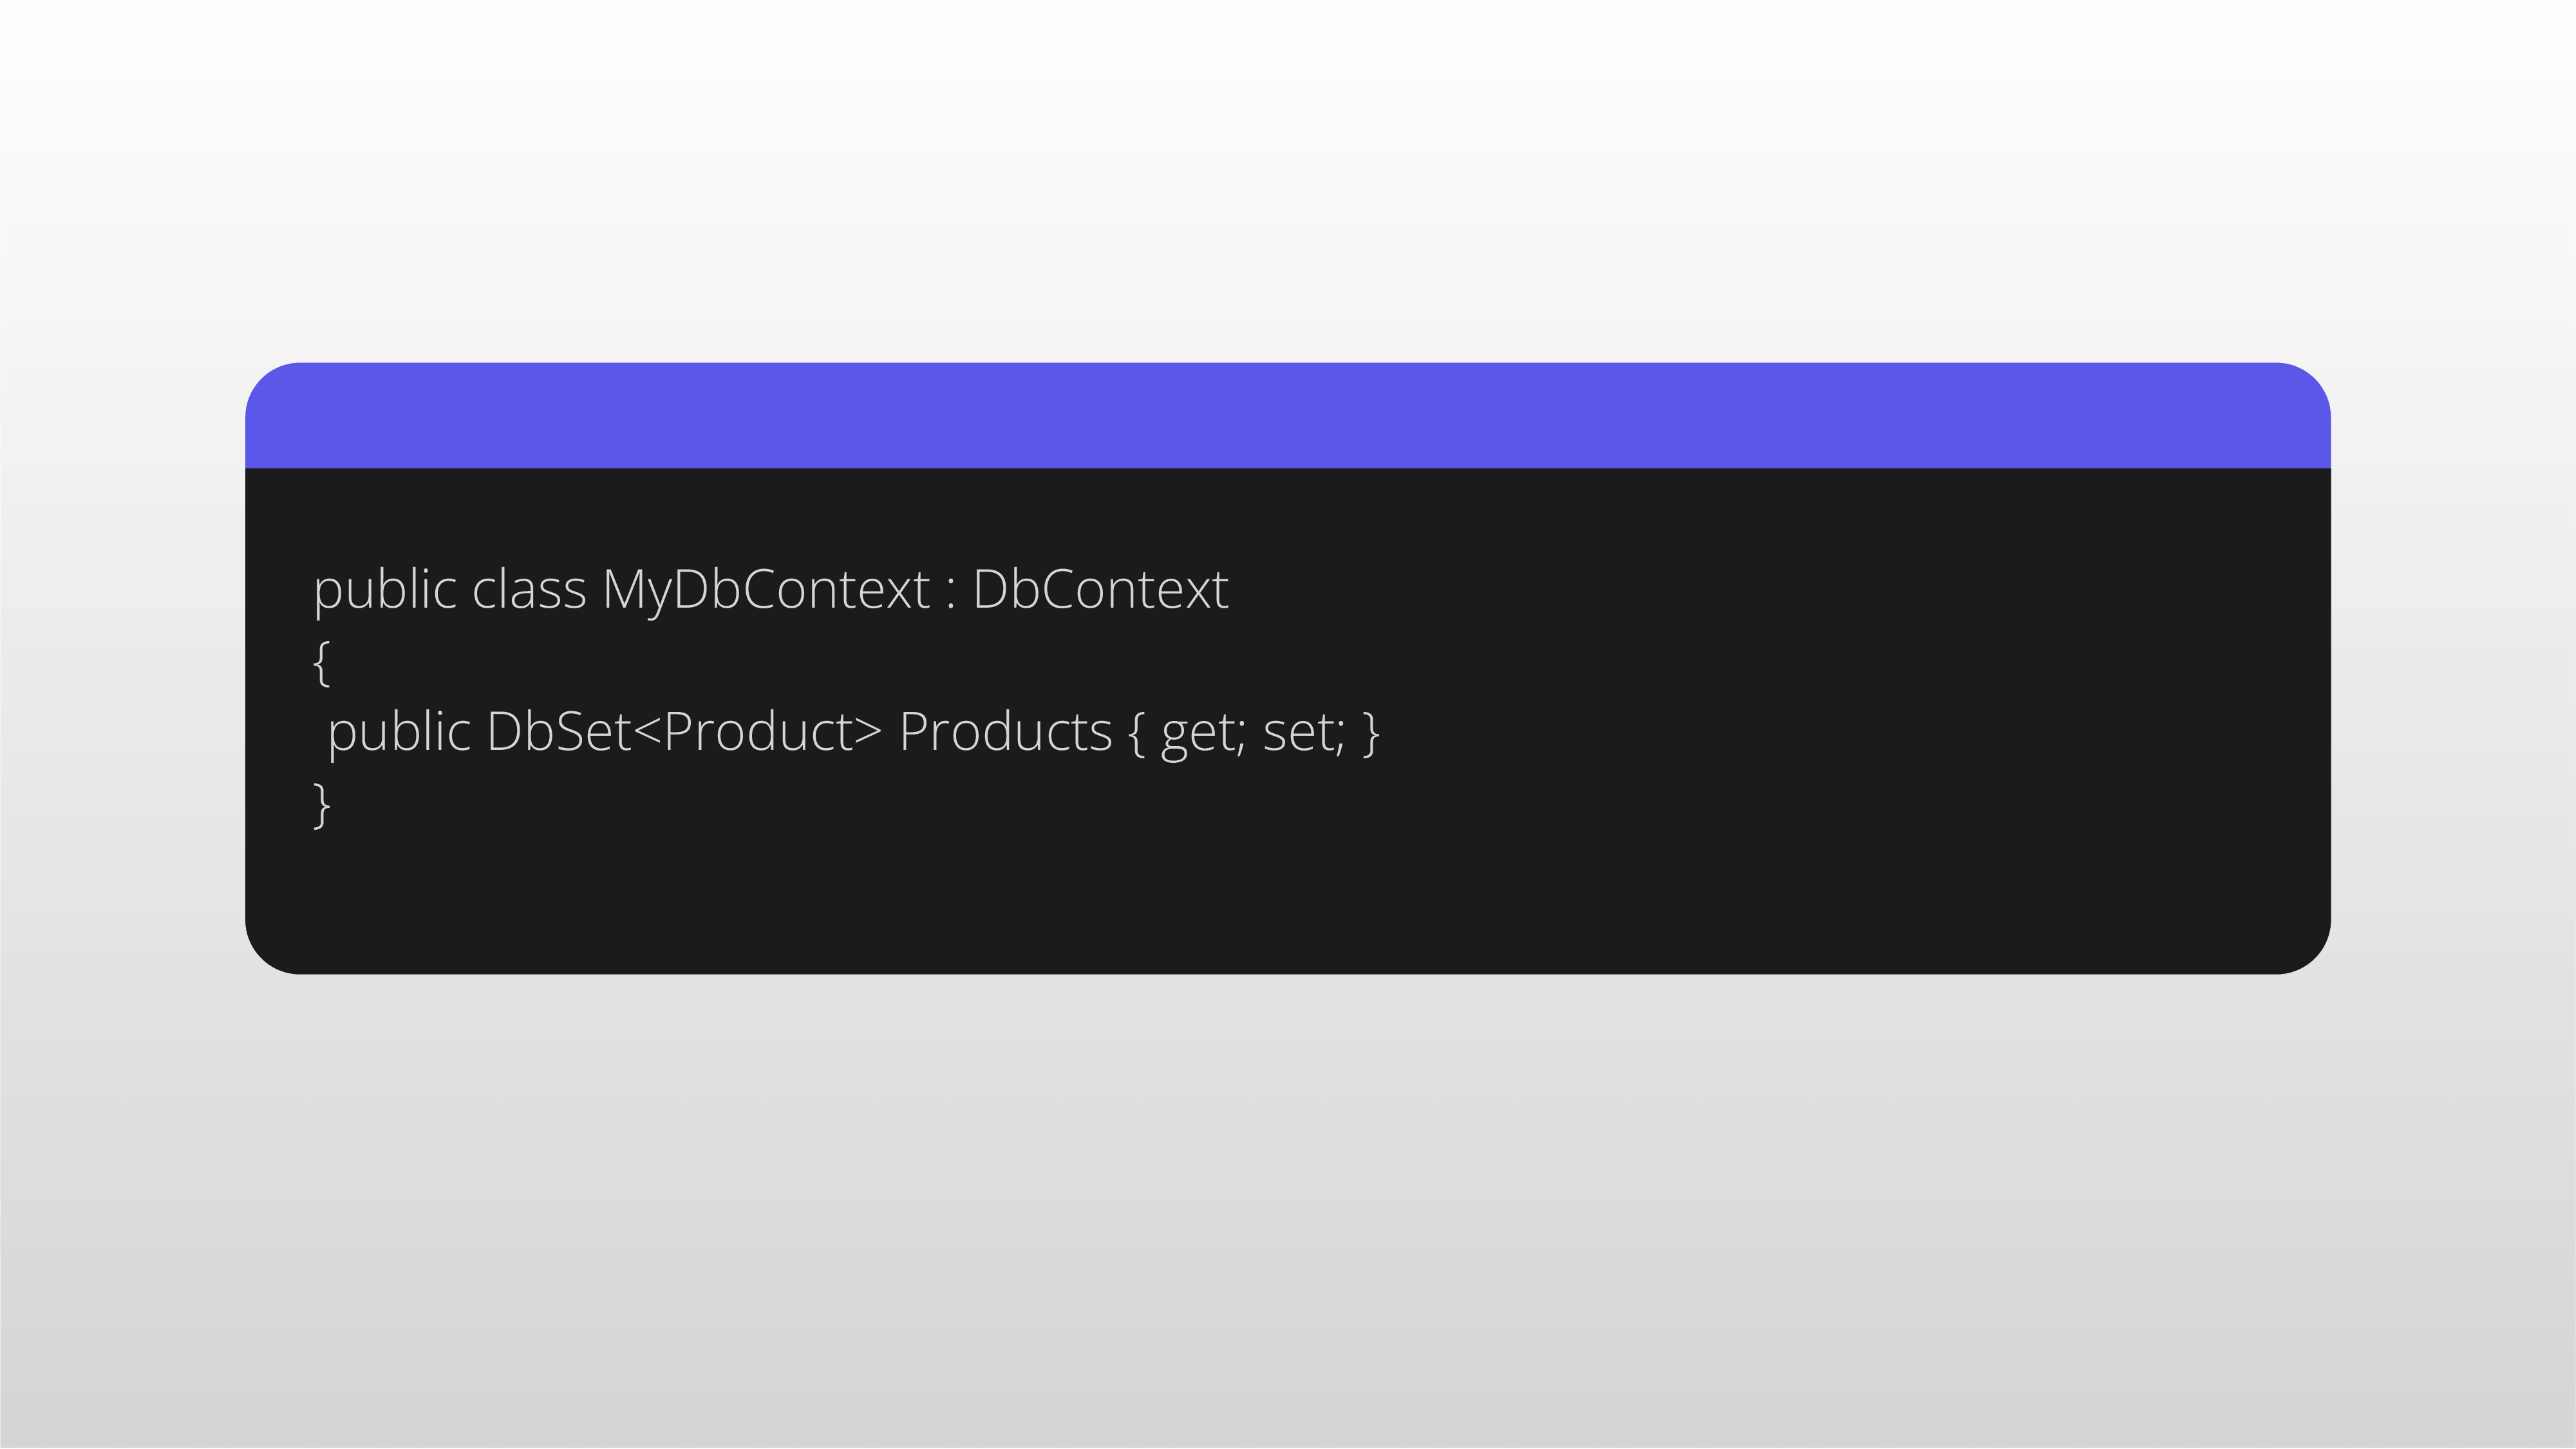
2. Create a database context class, like MyDbContext, with a property for your class:
3. Configure your application to interact with the database using the ConfigureServices method in the Startup class:
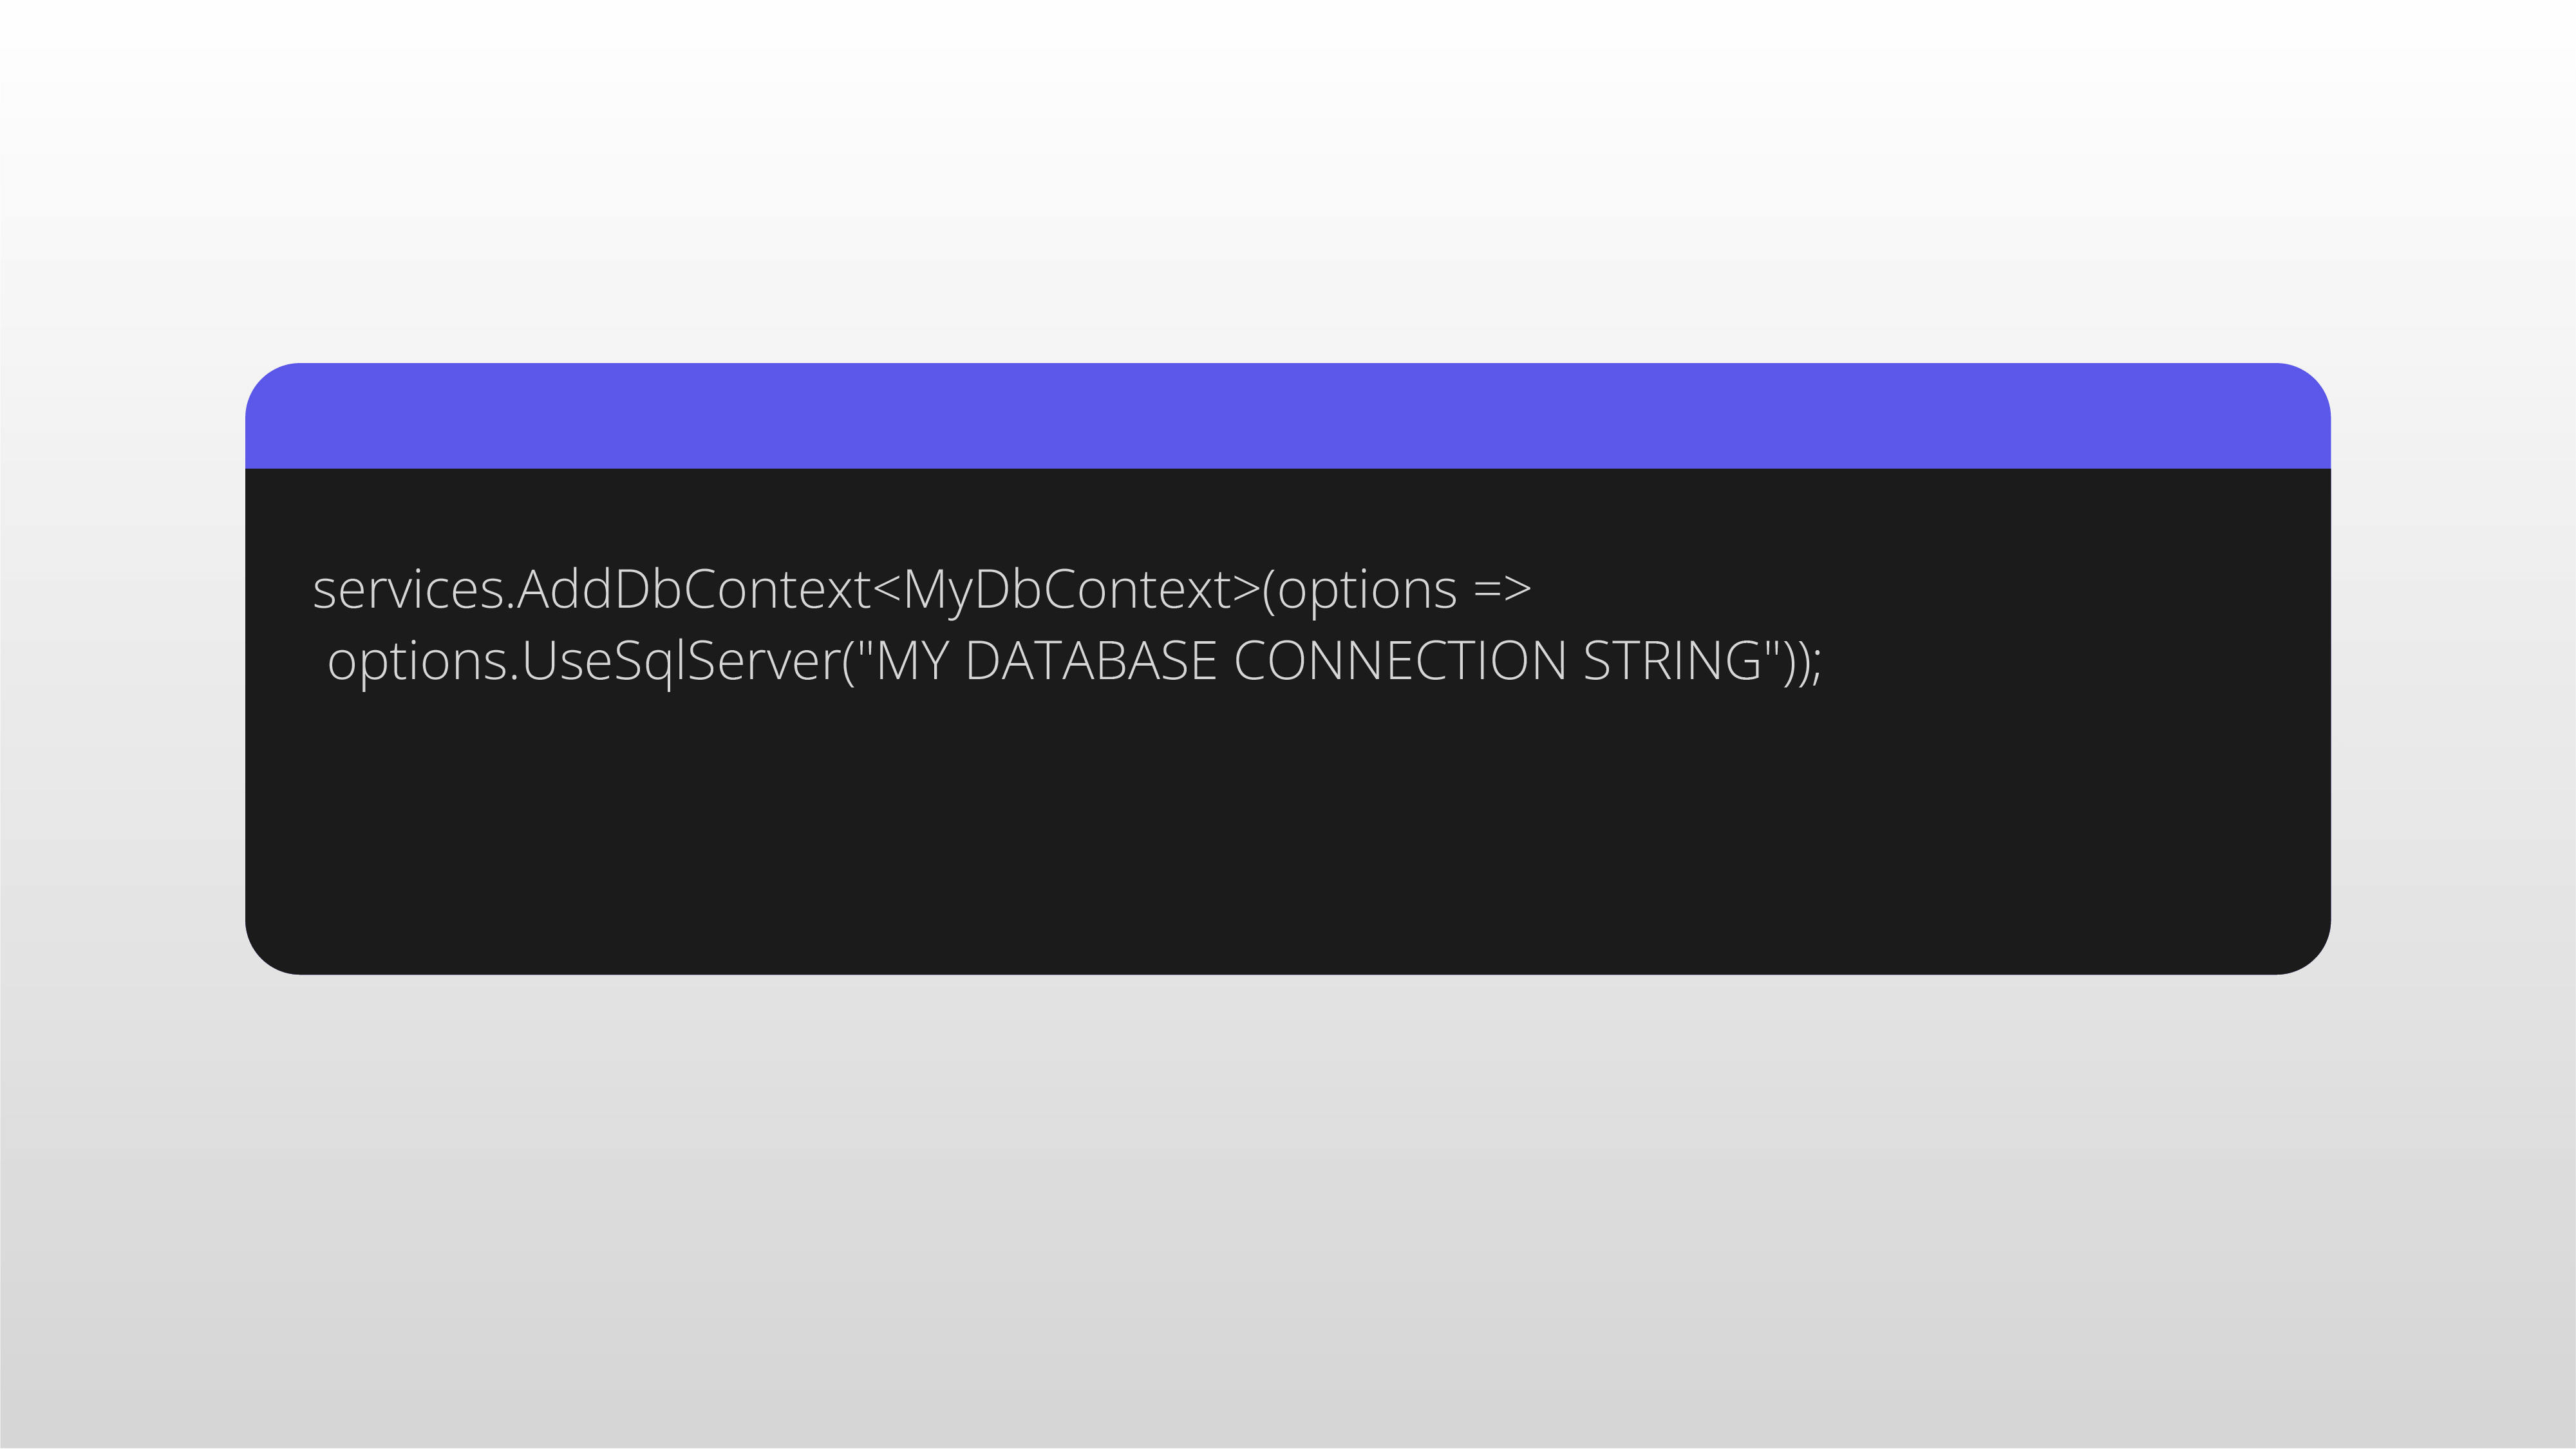
4. Connect to a SQL Server database with the specified connection string. Generate the database table with these commands:
dotnet ef migrations add ''Create Product table''
dotnet ef database update
This creates a Product table in your database. If you make changes to the class or add more related classes, rerun these commands with a new migration name to update the database schema.
–EF Database First
For existing databases, you can generate classes for EF Core using .NET command-line tools. To scaffold these classes, use a variation of the following command:
dotnet ef dbcontext scaffold "CONNECTION STRING" Microsoft.EntityFrameworkCore.SqlServer -c MyDbContext -t Product -t Customer
This command connects to the database using the specified connection string and the Microsoft.EntityFrameworkCore.SqlServer provider. After connecting, it creates a database context class named MyDbContext.
Additionally, it generates supporting classes for the specified Product and Customer tables using the -t options. There are various configuration options for this command, so you can tailor the class hierarchy appropriately for your database.
Interacting with Web Services
In the early stages of ASP.NET, SOAP services were the preferred method for exchanging data between web servers and clients. However, the landscape has evolved, and now, direct HTTP client interactions have become standard practice. With ASP.NET Core and Blazor, configuring your HttpClient is done in either Program.cs or the ConfigureServices method of the Startup class.
When you need to fetch data from GitHub, you create a client named "github." This client is configured with a base address, and the request headers are set accordingly. To interact with services, you inject the IHttpClientFactory into your Blazor components and create your named client using the established configuration.
This approach allows you to retrieve information, such as a string describing the collection of issues in the dotnet/docs GitHub repository. The content is returned in JSON format and can be deserialized into the appropriate GitHub issue objects.
There are various ways to configure the HttpClientFactory, enabling the delivery of preconfigured HttpClient objects.
Modules, Handlers, and Middleware
An ASP.NET Core application relies on a series of middleware – essentially handlers organized into a pipeline to manage requests and responses. In the context of a Web Forms application, where HTTP handlers and modules tackled similar challenges, ASP.NET Core replaces modules, handlers, Global.asax.cs, and the application lifecycle with middleware. Let's take a look at middleware within the context of a Blazor app.
The ASP.NET Core request pipeline is a sequence of request delegates executed sequentially. Unlike the ASP.NET Web Forms model, ASP.NET Core introduces the concept of lifecycle events. This makes it more straightforward to understand the request-handling process and allows middleware to be inserted at any point. Middleware executes based on the order of addition to the request pipeline, with these additions made in code within the Startup.cs file.
- Common Middleware. Similar to ASP.NET 4.x, ASP.NET Core offers numerous middleware components. While IIS modules may still be useful in certain cases, native ASP.NET Core middleware provides a modern approach to request handling.
You can find the table that shows some replacement middleware and components in ASP.NET Core here.
- Custom Middleware. When built-in middleware is insufficient, creating custom middleware becomes necessary. Middleware can be defined in various ways, with the simplest being a delegate.
Middleware can also be defined as a class, either by implementing the IMiddleware interface or by following middleware conventions.
App Configuration
In Web Forms, loading app configuration primarily involves entries in the web.config file. The ConfigurationManager object facilitates interactions with app settings and data repository connection strings.
With ASP.NET Core and server-side Blazor, the web.config file might be present in an IIS-hosted app on Windows. However, ConfigurationManager is not used, and more structured app configuration is obtained from various sources. Configuration is gathered from sources such as
- json files;
- user secrets;
- environment variables;
- command-line arguments.
ASP.NET Core provides app configuration through the IConfiguration interface. This interface can be injected into Blazor components, pages, or any ASP.NET Core-managed class needing access to configuration. Configuration values can be retrieved using indexers or the GetSection method. Strongly typed configuration can be achieved by specifying a class hierarchy, populated in the ConfigureServices method, and accessed through IOptions<MyConfig>.
ASP.NET Core offers a flexible and structured approach, accommodating various sources and allowing for both traditional and strongly typed configurations.
Authentication and Authorization: Migrating from ASP.NET Web Forms to Blazor with ASP.NET Core Identity
In the process of migrating from an ASP.NET Web Forms application to Blazor, adjustments to authentication and authorization are crucial. Let's take a look at the shift from the ASP.NET Web Forms universal provider model to working with ASP.NET Core Identity in Blazor applications.
ASP.NET has supported universal providers since version 2.0, offering a model for features like membership. The universal membership provider, commonly used alongside roles, operates with a SQL database schema including tables such as aspnet_Applications, aspnet_Membership, aspnet_Roles, and aspnet_Users. However, this schema is incompatible with ASP.NET Core Identity, necessitating data migration.
In Web Forms, authorized access configuration is typically handled in the web.config file. Restrictions for anonymous users and role-based authorizations are specified in this configuration. Additionally, per-location authorization settings can be achieved using the <location> element.
ASP.NET Core Identity introduces a different set of abstractions and assumptions compared to universal providers. It supports third-party authentication, includes UI components for common actions, and extends authorization capabilities with roles, claims, and policies. Authorization policies consist of requirements, providing a more granular control mechanism.
The migration includes four key steps:
- Database schema. Create the ASP.NET Core Identity schema in the destination database.
- Data migration. Migrate user and role records from the universal provider schema to the new Identity schema.
- Configuration update. Transition settings from web.config to middleware and services in Program.cs (or Startup class).
- Page updates. Modify individual pages to use ASP.NET Core Identity attributes like [Authorize].
Blazor framework aligns with the ASP.NET Core Identity security model, and the authentication state here can be accessed through cascading parameters or an injected AuthenticationStateProvider. The [Authorize] attribute controls access based on roles or policies, and the AuthorizeView component allows declarative control over displayed content based on authorization.
Blazor seamlessly integrates with ASP.NET Core Identity, offering robust authentication and authorization capabilities. But the transition needs some experience and attention to detail, especially when it comes to security matters.
We'll be happy to provide you with personalized guidance and comprehensive consultation tailored to your migration needs, so contact us for more information.
The Short Guide on Transitioning from ASP.NET Web Forms to Blazor
Migrating your code base from ASP.NET Web Forms to Blazor involves strategic planning and consideration of key factors. Follow this concise guide to ease the transition and make the most of Blazor's features.
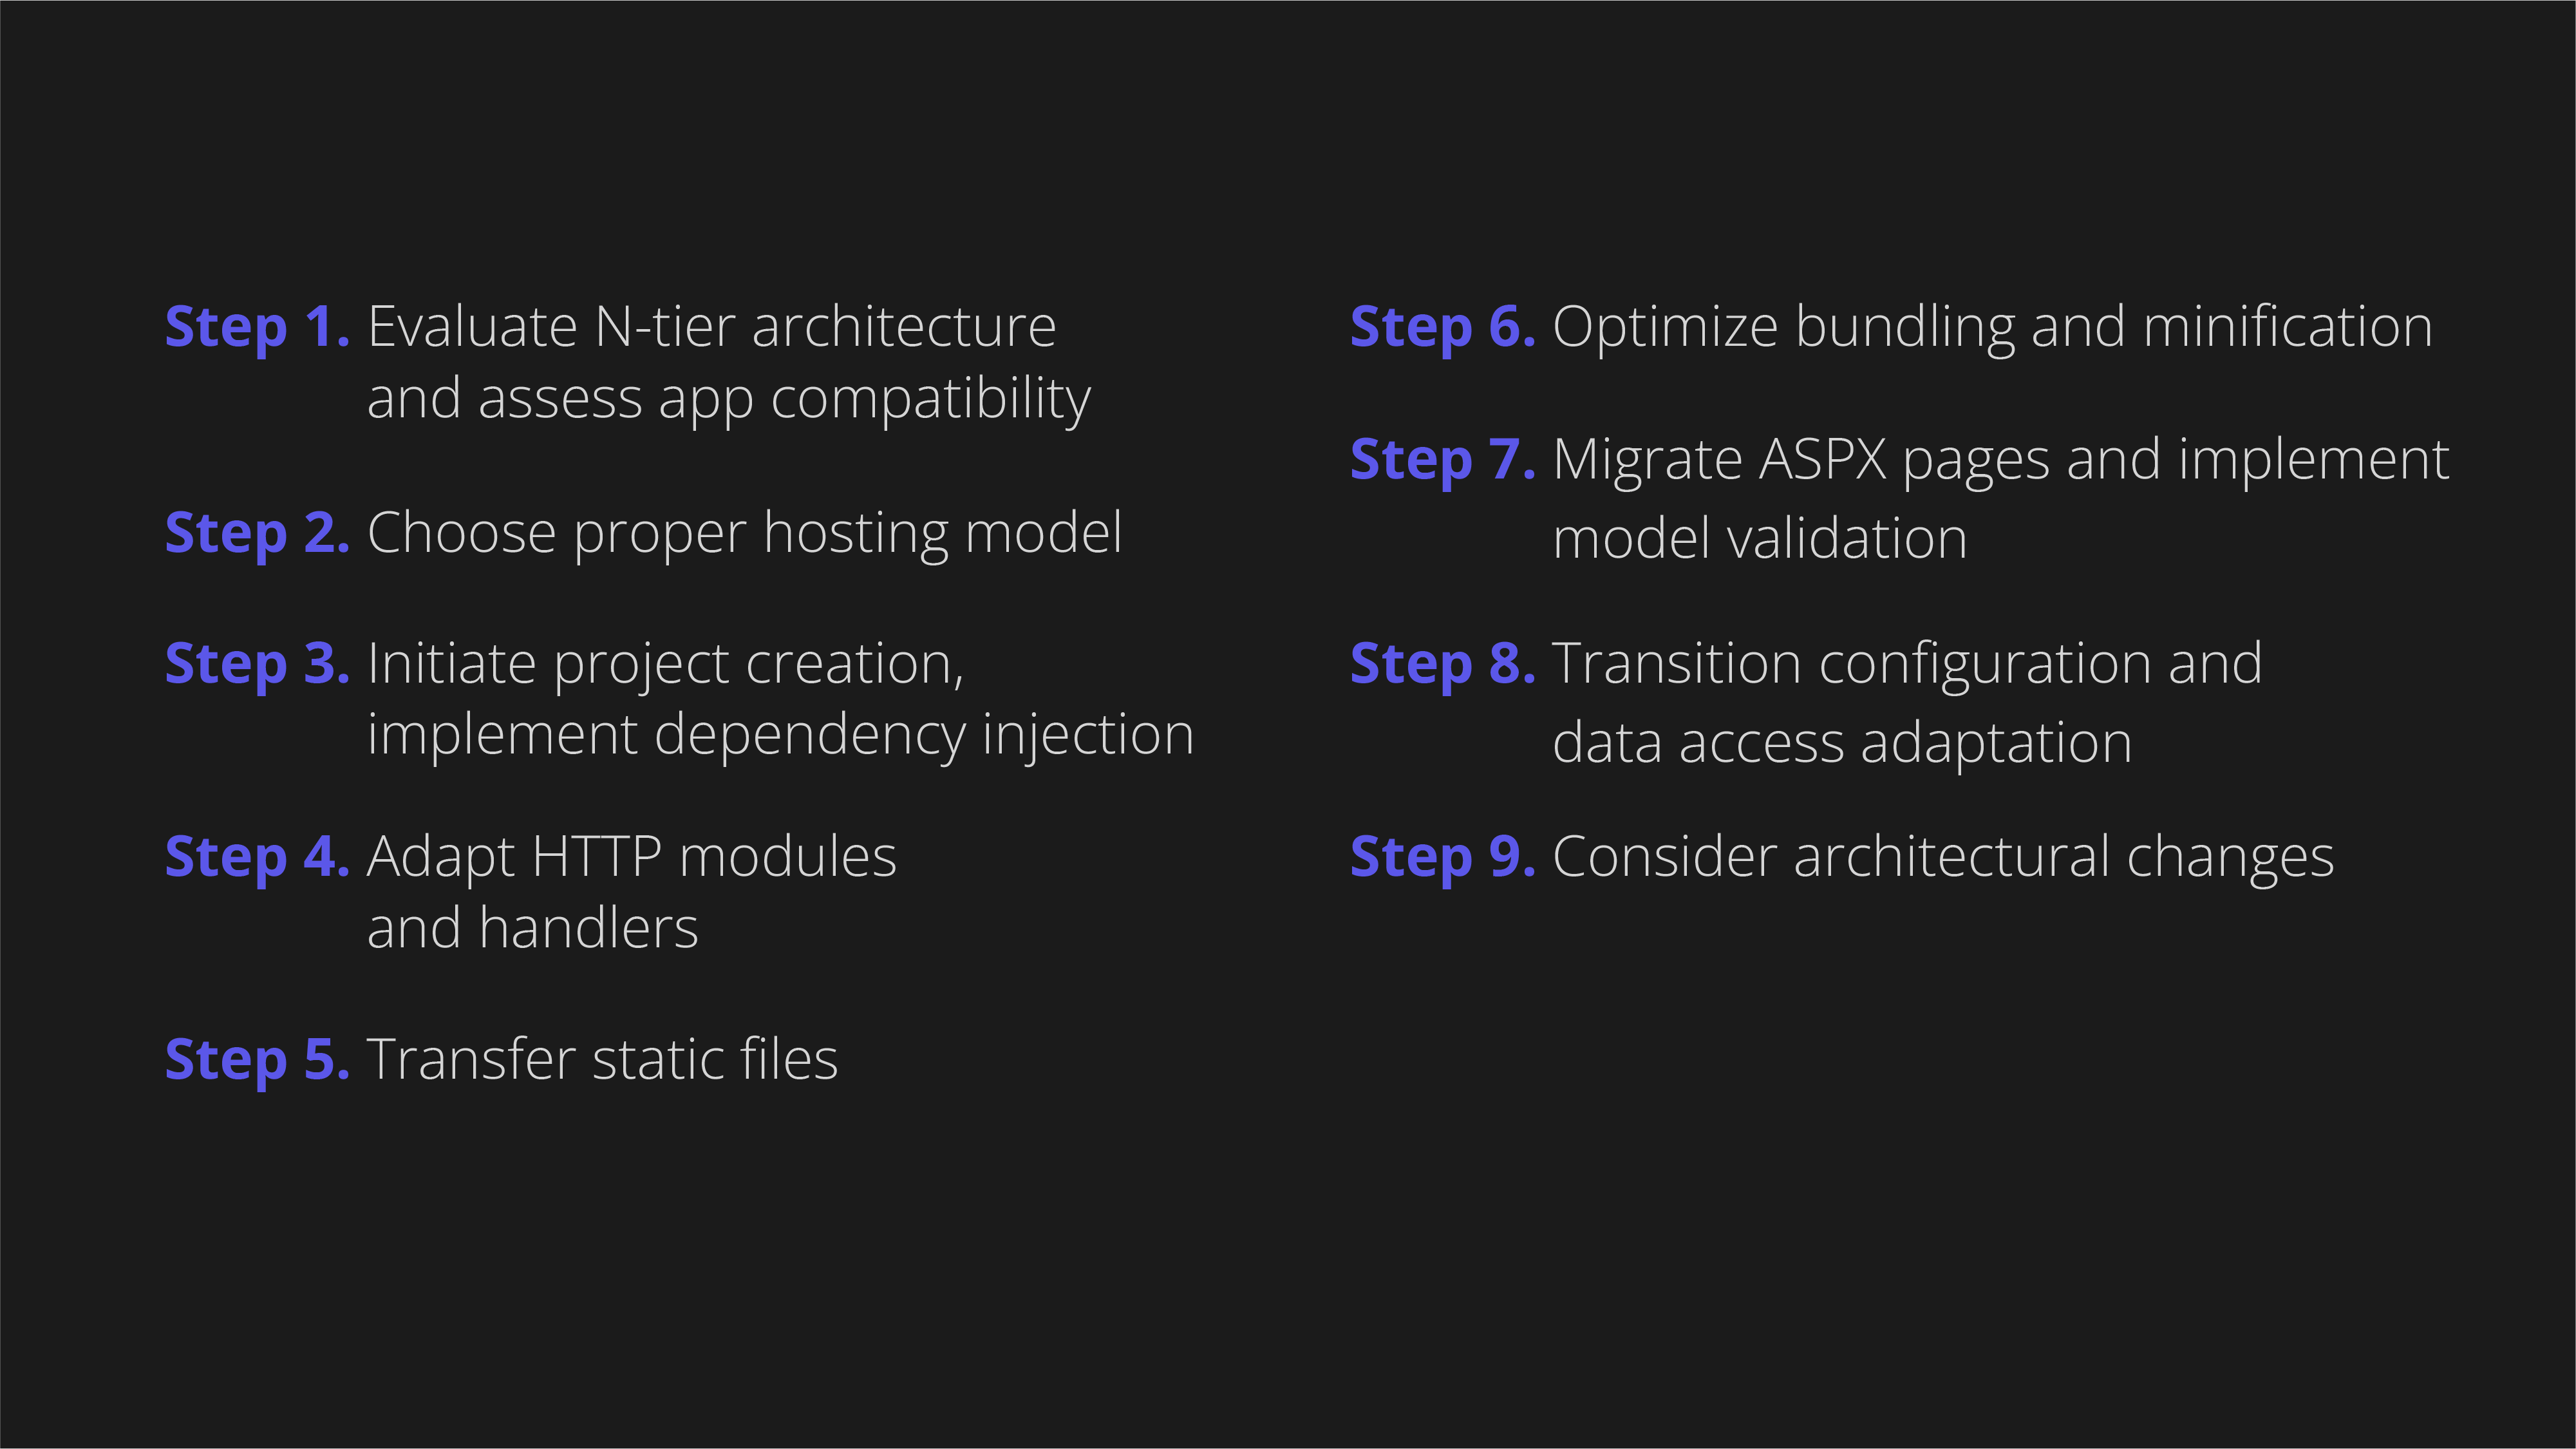
1. Evaluate N-tier architecture and assess app compatibility
Ensure your application follows an N-tier architecture, separating the app model (Web Forms) from the business logic. This clarity aids in identifying components to move to .NET Core and Blazor.
Determine if migrating to Blazor is necessary for your working app. While ASP.NET Web Forms will be supported for years, Blazor offers performance improvements, WebAssembly support, cross-platform capabilities, and more.
2. Choose proper hosting model
Before the migration, you should decide between server-side and client-side hosting for your Blazor app. It is critical for further application development and scaling. Pay attention to key differences and choose the model that best suits your app's requirements.
3. Initiate project creation, implement dependency injection
Start the migration process by creating a new project based on the .NET SDK style. Install the necessary libraries and dependencies used in the previous Web Forms project.
Dependency injection (DI) is a fundamental principle in ASP.NET Core. Update the startup process to accommodate Razor components and leverage DI for better customization.
4. Adapt HTTP modules and handlers
Migrate from HTTP modules and handlers to middleware in ASP.NET Core. Pay attention to the differences in handling lifecycle events and implement middleware for a seamless transition.
5. Transfer static files
Ensure smooth serving of static files by configuring middleware. Learn how to expose and customize static files for optimal performance.
6. Optimize bundling and minification
Adapt your runtime bundling and minification setup to ASP.NET Core's declarative approach. Be attentive to the changes and enhance performance through optimized file handling.
7. Migrate ASPX pages and implement model validation
Convert ASPX pages to Razor components (.razor extension) in Blazor. Pay attention to the mapping and compilation details for a successful migration.
If your Web Forms code includes validation, transfer it seamlessly to Blazor using data annotations. Leverage Blazor's support for model validation without custom JavaScript.
8. Do not forget about transition configuration and data access adaptation
Move from web.config-based configuration to ASP.NET Core's flexible configuration system. Here, you can use the new approach and utilize configuration options for your app.
Ensure smooth data access migration, especially if your project uses Entity Framework (EF) 6. Address changes in DbContext and move towards asynchronous patterns for improved scalability.
9. Consider architectural changes
Consider architectural differences when migrating to Blazor, including changes related to .NET Core support and ASP.NET Core operations. Be aware of feature removals and embrace the reimagined ASP.NET Core version.
This is only a short guide to show a structured approach to migrating your ASP.NET Web Forms application to Blazor. For further assistance and tailored migration support, feel free to contact us. We'll be happy to assist you here. Let’s talk!